Friday, March 30, 2012

Bathroom Latest: baskets, vanity and fabrics

 One of the hottest finishes lately has been the Belgian washes 
you see on furniture and baskets.
 Its a gray wash~I wanted to make all the
baskets in my bathroom shelf look Belgian~
 French Linen Chalk Paint® is what I used and a big paint brush.
This is the latest color I was dying to try~
and it works well on these baskets I am happy to say.
 Don't load up the brush, apply it with a dry brush 
and it is the easiest thing in the world!
 I had all the baskets done in 15 minutes.  
Have you noticed I like quick projects with big results?
 The baskets have cotton duck liners and they
sit in this built in next to the commode.
Don't ask me why there is a built in right there~
maybe it was supposed to be a library!
However all the bathroom closets hold my clothing,
so the towels had to go here.
This was the way they looked when I bought them, in a dark brown finish.
 Now they are all washed out in the Belgian finish.
They look a lot softer and go with the linen draperies.
This basket on the tub was the finish I was trying to copy,
and the French Linen paint is pretty close to perfect.
 One of the things I am working on is a new vanity skirt~
I ordered the toile, 
but the pink is wrong and its just too much pink...
 The tiny french print on the right looks pretty
 with the walls and the gold and the austrian valance~
the one on the left is very elegant and monochromatic...
but I might just go with something else...
 While that is percolating in my brain, 
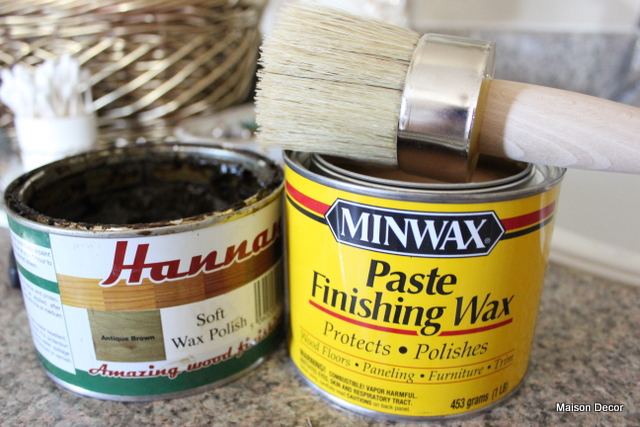
I turned to waxing of the bathroom cabinet. 
The base coat is Antoinette Chalk Paint®, 
so I need to apply wax to seal the cabinets.
I am trying out the Minwax brand 
of paste wax as it is easier to find at the local store and cheaper too. 
 I splurged on an Annie Sloan wax brush and it was lovely to use. 
This brush  is dedicated for clear wax only.  You can't get the dark 
wax out of your brush, so since I will use a clear wax more 
often and over greater surfaces like kitchen and bath cabinets, 
I want my big fancy wax brush to be my clear wax brush. 
I used a cloth for the dark wax application.
 First I applied the paste wax to all the cabinets 
and after that I put on the dark wax.
This brand of paste wax is a harder wax than the Annie Sloan™
clear wax, which is way easier to apply. You can use either,
and I was curious to try this one, however I can see
that I will go back to the softer easier wax after this project.
Now for the dark wax~
See the splotches?  I dot it on and
then rub it into the pale pink areas~
it gives a nice aged finish and it tones down
 any color it goes over...so in this case the pink 
now has a brownish layer.
 Then I took my dark wax and put some on the 
chandeliers to make them look a little nicer.
 By nicer, I mean older! 
The dark wax does a pretty good job 
of antiquing metal too.
See the three cabinets on the left have only clear wax 
while the rest of the vanity has both clear and dark. 
Its a matter of personal preference, 
so use your wax accordingly!
I hope this answers some of the questions
 I get from you on the wax process.
I'm waiting on the hardware for the vanity to be delivered~
and I am excited about it! 
I still have a few more things to do~
but all these little projects take time and 
do add up to creating a whole new look.

I'll be headed into Boston on Monday
 for the Annie Sloan paint workshop!
I am hosting Jami from Freckled Laundry
as my house guest too~so that will
be really fun to meet this sweetheart in person.  
She is driving up from New York 
to attend~and then after the workshop we were invited
 to a dinner reception with Annie Sloan herself!
So I will be rubbing elbows with the high and 
mighty of chalk paint land and you can be bet
I will be blogging about it all to you guys!
(One thing I want to do is get a new pic of Annie~
is this the only photo that exists of this woman?)
Ok~gotta get the house cleaned up for Jami's arrival~
have a great weekend everybody!
Photobucket
Read more »

Thursday, March 29, 2012

Pink silk Austrian valance and other pretty stuff~


 Today's post is filled with pretty stuff!! 
I found this darling Venetian style plaque at an Etsy shop,
Stacy's Shabby Shoppe. Stacy has lots of feminine 
and romantic items for sale, and this one called my name. 
 Its vintage and PERFECT for my pink and gold bathroom. 
  Now I just have to decide where to put it!
 For now I tucked it behind a wire and beaded candle sconce. 
 Hanging artwork is usually the last thing you do when 
you are decorating a room...but sometimes you just 
can't help wanting to put it up on the wall!  For those that
 are new to this series on my bathroom makeover, 
 the closet doors I painted have pink and gold accent colors.
 This Venetian tray in pink and gold perches on the edge 
of the tub holding some bubble bath for moi~!
  The new draperies I am now happy to
 have in my shop (click here to see more) are linen sheers 
with a damask grey print~ truly french vintage in feel!
Its hard to find panels extra long, and these are 102"!
 Since the tub is off center from the window, 
I draped one panel straight to the floor, and pulled the
 other side back with a gold acanthus leaf holdback. 
 For over my dressing table I wanted to make an Austrian shade
 out of a fancy ($$$) pink and copper strie silk panel 
I had in my stash from another house, days gone by...
 You can do this with any drapery panel you already have~here is how to turn it into an Austrian valance.
That means its stationary, it won't be going up and down...that would be an Austrian Shade. This valance is a fussy treatment that usually is quite expensive to have made...so pay attention if you would like one on a dime.  Get some shirring tape with two rows of string in the tape. Cut your drapery panel to be 3x the finished length of what you want your valance to be. The width of this fits my window as I want to have floppy ends and I plan to staple the extra width around the sides of the mounting board. If this sounds too hard, just look at the pictures and you will see what I mean.
 The shirring tape that you will cut and pin to your fabric, 
leaving a bit to hang over the edge of the fabric.
You can get this tape at most fabric stores.
 Stitch it down on the outside of each side of the tape (so two rows of stitching). I am going to have two swoops so I have three rows. You could do four rows and have 3 swoops, or 2 rows of tape for one swoop~your choice! I plan to add the moss fringe along the bottom when I am done to jazz it up.
 Here is the tape pinned in place 5 inches from my ends so it will have a floppy edge. You can stitch it to the ends if you don't want the floppy edge.  I tucked the end of the tape in the bottom hem and folded it over. Then stitch it up! Take out your pins!
 Stitched the trim on and now you can 
see what it looks like from the good side.
 Now pull all the strings up and see all the folds 
start to take shape. See how easy this is? 
 Flip it over and I'll be darned~its an Austrian Valance! 
Now at this point my panel had a ready made rod pocket 
at the top and I could have just slid it into a big rod 
and hung it, but I wanted mine to go on a board.
 Staple the top of the panel to the board and then fold
 the excess around the edges and staple that too.
Its now ready to hang by using angle iron brackets. 
 This is the valance in the window~you will get to see 
more of it at the reveal cuz I still have stuff 
to do on the dressing table skirt.
 Its a feminine and fancy type of treatment 
and its rare that I make these...
actually this is the first one I have made in 21 years!! 
They are pretty done up in sheers too~so now you now 
how to make this expensive valance for yourself.
And one more pretty thing I want to show you today is
 this lavender hooked rug my sister Susan found
 for me in Kansas City while shopping for items for my vintage store!  
Its in the hallway outside my office and I love it!
Have a pretty day everybody~
linking to
My Romantic Home
Photobucket
Read more »

Wednesday, March 28, 2012

French Country Feature on Houzz

Gorgeous! 
A gilded french bed dressed in lilac bed linens
and a Ralph Lauren floral comforter sitting on a seagrass rug.
A large rustic wicker hamper basket at the foot of the bed mixing
with the elegant gilt bed is an example
 of how to get  the french country look~
mix the rustic with the refined.
I received an email from Houzz telling
me that some of my work was being
featured in their cover page article called 
  Click on the title above if you would like to read more.
They used one of my photos I took of a home I decorated last year.
****
I also received the Best of Houzz 2012 decorating award
recently, which was a nice surprise!
I'll be working on my french style bathroom makeover
and be sharing more soon!


Photobucket
Read more »

Tuesday, March 27, 2012

French Vanity Seat


 Part of the bathroom makeover includes 
a remake of the vanity table and bench.
 The decorating style is French, of course~
This very old vanity bench sat in an antique shop
 in New Hampshire until I rescued it~
Then I did this to it. I upholstered it in a thick matelasse quilted cover
and painted it in old white chalk.
Now it needs to be frenchified so it fits the new style of the bathroom
 so I started by upholstering the seat cover in white linen and roses.
 This is pretty easy to do, just cut a square and start stapling
 at opposite ends, North, South, East and West.  
Pull tightly on the fabric so it stretches 
around the cushion frame and then zap in your staples.
 Do the entire perimeter with lots of staples, 
I used 9/16" size so it would go
 through the layers of fabric and into the wood.
 Nothing too pretty~doesn't need to be.  
Trim off the excess fabric and your done with this part.
 I loved this linen print I found on Etsy.  
Etsy is a great place to find small remnants 
of high quality fabrics at great prices.
 I used the Lowes Brilliant Metals in Aged Brass over
 Antoinette Chalk Paint to get this finish on the frame. 
 The gold sheer creates a coppery shrimp 
color with the pink chalk~its really pretty.
 Then I brought it up to the bathroom and had to admit 
I did not like the gap around the cushion
between the frame.  I still hadn't screwed it down and 
it would have pulled it together somewhat,
but back down to my workshop this little lady went.
 Lucky me~I had enough moss fringe (or brush fringe)
 in just the right colors of pink and white!
 I stapled the moss fringe to the frame, not the cushion.
 After stapling it, it looked like this~
then you have to pull out the thread that holds the
 mossy fringe together on the bolt...
and when you pull out the thread it gets all fluffy like this:
 I love moss fringe! I love it on pillows and 
on tablecloths and on draperies and now on seats!
 Its thick and fluffy and should
 hide the gap nicely while adding frenchy flair.
 Here is is all together~now back to the bathroom it goes!
 I had one more thing I wanted to do to this bench. 
 Since the bench faces the vanity seat,
all you mostly see is the back of the bench, 
and its kind of plain except for the pretty legs.
 Pretty Leg
 See what I mean? Plainish...
 I bought this gorgeous old handle pull from Etsy too~
I didn't know quite what I was going to do 
with it in the bathroom, but it was going to go somewhere.
 It makes for an easy grab when pulling out the seat~
 And it looks frenchy and pretty!
 And I just couldn't stop apparently, 
as I added these tassel ties to the legs 
to dress up the back view a little bit more.
 Now I have to get going on the vanity skirt 
and other things~but this is one thing off the list.
But here she is~
a pretty french vanity seat! 
linking to
and

Photobucket
Read more »