Our shop in Reading has a lot of painted and embellished
sample boards that we have made over time using different
products. Many are Chalk Paint sample boards, and then
there are those that we have used more decorative techniques
by adding combinations of pearlescent,
gilded, crackled and transfer mediums.
I noticed it was hard for shoppers to figure out what they were looking
at, so I came up with the idea of grouping samples together
inside of vintage gilded frames. I had been purchasing old gilded
frames at auction. Most had ugly artwork or broken bits so I was
able to get a good deal on them. Colin cut out backing boards out of
luann board and painted them with traditional chalkboard black paint.
He mounted the boards inside the frames and they looked stunning!
I could have just put them in the shop and sold them like that,
and maybe I will now that we have our inspiration wall finished,
After the boards were put in the frames I laid out groupings of samples
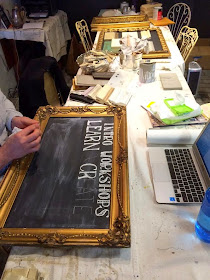
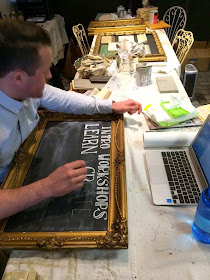
and Justin got to work creating his magical Chalk Art fonts.
He does it all freehand, and will look at various fonts online for ideas.
You can see how he starts off by spacing the letters with simple stick lettering.
Then he starts getting creative, which is when the magic happens!
He is working in the back room where we hold our workshops.
During the week we usually have various projects in different states
of progression on the table. You can see the other boards in the back, as well
as a simple sample board I am doing using an
Efex molding for an upcoming class.
More on that at the end of the post.
AFter he got his lettering all finished, Justin glued down our samples.
This board is meant to show what finishes you will learn when you
take our popular Chalk Paint® Introductory Workshop.
I love this frame, by the way! Look at the moldings on this baby!
We had a few boards made up showing off the Artisan Enhancement line that we carry.
There are many different decorative things you can do with this line, including
various crackling techniques, image transfers, foiling, stone finish and pearlized finishes.
Now when you come in to get inspiration we hope our boards inspire
in a more obvious way!
How wonderful were those incredible antique frames?
You can easily add embellishing appliques to any frame to get
a similar look to a vintage plaster over wood or carved frame
by using a combination of Efex moldings onto a simple frame.
I am working on different boards using our new Efex latex molding line
we carry in house and online. This one is a very fine detailed ribbon
applique. You can see a pencil tracing mark around it. When you apply
the applique, you just roughly trace around your piece, then apply the contact cement
to the board and the back of the piece, wait 20 minutes, then stick together and press
down to make good contact. The tracing line just helps you see where
to put the cement, and where to stick your applique.
Then after about a half hour you can paint right over it.
I am using French Linen Chalk Paint by Annie Sloan.
Push the paint into all the crevices of the molding and then
brush them out so there is no globbing.
I finished it off with a wash to get this lovely Gustavian look.
You can see all kinds of moldings from the Efex line in our shop
as well as online. Imagine taking a flat panel door on a cabinet or a closet
and creating an antique French looking vibe!
Or make fancy frames for your own fabulous chalk board to hang
in your kitchen or dining room!
You can join us at a new Applique and Molding Workshop,
coming up next month! We will be making a wall plaque using the Efex
moldings and decorative paint finishes. You will see how easy it is to
plan a project with Efex latex moldings. You will lay it out, cut, glue and paint
and up with stunning results!
Rounding out the week finds me wearing my designer hat.
Today I will be styling a clients home.
Did you know I am also a HomeGoods Designer?
I am part of a hand full of national designers in the HomeGoods
Happy by Design Pinterest program!
Four carriages and two rolling flat bed carts were filled
for this exciting home styling project.
I will be sharing the finished results soon.


Such pretty frames...great idea to inspire us all...
ReplyDeleteHi Amy,
ReplyDeleteShopping by to see all the beauty you are creating here.
To then take it all in.
Xx
Beautiful successful weekend to you.
Keep inspiring us
Doré
I love all of your display boards and your right...that chalk work is fantastic! How great it would be to take one of your classes! I have had my eye on the moldings for some time now and my mind is reeling with ideas!
ReplyDeleteGigi @ Old World Patina
You all did a really nice job with your boards and samples. I know a lot of people can't picture objects finished. (My hubby is one of them) I wish we had a shop in Southern California like yours, but, we don't so I get ideas from your blog. Thank you for sharing with us.
ReplyDeleteI love how you organized all the samples into the gold frames. That's a great way to display them. I can imagine all kinds of wonderful things that can be done with your new line of embellishments. Always love seeing bits of the store.
ReplyDeleteI say it all the time but you blow me away... I love how you make things just happen, you make it look so easy...and I love a doer! These are simply gorgeous and you know I am a fan, cannot wait to own an "Amy original" soon I hope??? I also really want to join your next workshop! Is the schedule posted somewhere?
ReplyDeleteI am bookmarking this post so that I can refer to the names when I go to get the plants :) Superb post :)http://www.luluhypermarket.com/GoodLife/6-stunning-dcor-tips-for-bachelor-pads-zzrod40.html
ReplyDeleteOh I love the inspiration wall...and how fun it is to be a HomeGoods designer!!...
ReplyDelete