Sunday, July 31, 2016

Our white picket fence


 It finally came. 
The day had arrived to have the fence installed. After months of 
waiting to order a fence, and then another two months for the installation day,
I can say it was truly worth the wait!  I think it is one of my most favorite home
improvements and worth every penny.  After getting the puppy, I did not want another decade
of always needing to put a lead on him to take every. single. bathroom break. through every.
single. season.  We don't have a big yard, and its configured in a terraced fashion, so figuring
out a fence layout was a bit of a challenge.  In the end, we did a privacy fence with picket top
facing the street, with a gate to allow entry to get to our front door.  And then an open picket
with the same spindle style and another gate to get out of the fenced area into the back end 
of the yard, which is where our courtyard and our upper level garden and shed is situated.
 Its a small area that was fenced in, but big enough to fulfill its role of glorified dog pen.  
And I couldn't be happier!  For the first week we barely let Colby go inside, 
and he would whine to get in the pen.  Hahha! Reverse psychology really works.  
Of course when I am outside wandering around, he does get to tag along on his green tether, but when I am in the house and he needs to go out, I simply open the door.  Its so nice! He has gotten accustomed to the new routine and its working out well.  I know when winter rolls around I will be ecstatic that we have this pretty fence.  It has a classic New England feeling and it makes the house seem more stately, if you know what I mean.  I am still finishing up the shed, but it is already loaded with garden things and it is very cute sitting up on the upper level, with the tomato garden right in front of it.  A new rose bush for the arbor, and some blue hydrangeas were added to the inside of the dog pen, (ugh should I really call it a dog pen??), and summer is only half over.  
I am enjoying the gardening and decorating of the outdoor spaces very much.
August is coming, and I hope we get more sunshiney days so we can enjoy
the outdoors.  Everyone seems to love gathering in the courtyard as the day comes
to an end.  And I love when that happens.
 photo signature_zpsxi5q1w6r.png
Read more »

Friday, July 29, 2016

Easy Alfresco Entertaining Ideas from Matthew and Amy

Making magic moments....
Would you like some beautiful outdoor entertaining ideas? 
I mentioned in the last blog post that I participated in a short film with Matthew Mead
for his upcoming presentation at Haven, the big blogging conference in Atlanta.
Matthew has given me the green light to share his images with you from that day~
and what inspiration they hold!
We filmed a story of how to create a stunning party, alfresco style. 
The setting was an enchanting pergola made of twigs and logs, 
that had grapevines covering the structure.
But regardless, you can use these ideas for your own patio or backyard or deck to
create some terrific moments for your next party.  Remember that you can always
bring an indoor piece of furniture outdoors, like a side table to use as a bar or server.
How about this centerpiece that Matthew made using a tiered display piece?
  Filled with fruits, vegetables, flowers and votive candles, 
it is a natural and beautiful centerpiece without the fussiness of 
the standard floral centerpiece many of us employ. 
Not to dismiss a floral centerpiece too quickly, Matthew created a show stopper
of a statement piece by clustering flowers in this glass and twig vase he found
at HomeGoods, and then added his own touch by spraying the base of the twigs with
his copper metallic Fusion paint from his own paint collection.  Placed on a
counter height stool, it is a stand alone piece that creates a memorable moment in any setting.
 A hint of how to get started before any party when you want to have decorating options,
just gather bunches of flowers in a theme.  These are all harvest type colors, as the film is 
geared to Fall entertaining.  For summer you could do groupings of hydrangeas and roses,
or multiple blooms from your local grocer or florist in one color-way.  
After you have your flowers, place them in the sink or in
pails and then gather your receptacles for your arrangements.  
Jelly jars, juice glasses, vases, galvanized tins, empty tomato cans...you name it!
Then create smaller centerpieces for your outdoor table tops.
Matthew created small arrangements (3 of these), and then placed them 
at the main table, instead of one large arrangement.  It was casual and chic.
Imagine your own simple picnic table....
totally transformed with fruit and flowers and a few candles.
You will be entertaining with style!
 We had such fun making this film, which was shot by the Wagner Spray Tech peeps.
I got to see the finished film and I was so impressed with how it turned out.
It will make its debut at the blog conference Haven, and then I hope to share it right here!
Until then, use these ideas to create a memorable outdoor dinner party.
Even if its just for you and your regular cast of characters.
These are the things that can add a little zip to life, 
creating moments of beauty in a world of mundane living.  
Make yours magical!

 photo signature_zpsxi5q1w6r.png
Read more »

Sunday, July 17, 2016

French door for the shed and filming with Matthew Mead


 So much progress to talk about in regards to the ramshackle shed project!
As you can see its looking quite finished, which it practically is now.
Instead of using just an old screen door I had from Brimfield, I spotted a pair of
old french doors for sale on a Facebook yardsale page, so I ran off to buy them.
I hoped I could have the pair of them on the shed, but together they were too wide,
so we settled for one.  I painted it black and hubs installed it for me with my help.
Its quite darling, and since the shed is very tiny and has no windows, this glass
door seems to be the perfect solution for both adding style and light to the structure.
 Since I hate heights, even the shortest of heights, Justin did the entire roof 
with the cedar shingles.  Topping it off with a cedar shingle ridge treatment,
it is finished and basically waterproof now! 
 The idea to stain the exterior with a solid white was so it would go along with the house and the white arbor.  Using a big fat 5" wide brush made short work of painting the siding.  I still have two sides left to do, and that will likely be done next week.
 It is really adorable and I can't wait to clean up the site, put away the saws and ladders and all the tools.  Then move in my rakes and shovels and gardeny stuff.  The interior is not going to be all dolled up, its just going to be a utilitarian garden shed.  Over time that may change, but I have a small tomato garden that is going gangbusters and I just want to keep up with the watering and weeding and staking of the plants. 
The arbor needs a coat of the same stain, so I have been tackling that as well.
I also whipped up a new umbrella cover using Sunbrella Cabana Classic in black and white
which looks pretty with the black door and the white siding of the shed.
I will post more on how I did that project, but in essence it was simply taking off the umbrella
fabric (did you know you can do that?) and then copying it as a pattern to cut new fabric pieces
and then sew them together. Much quicker and cheaper than buying a new umbrella!
 So the shed is part of the backyard transformation, and it is really 
looking cute back here in the courtyard.  After I get all the tools put
away I will share some pics.
 In other news I have been doing a few things with Matthew Mead.  Yesterday he came out 
to the house to photograph my office studio for the magazine, Where Women Create.  
He brings flowers for the shoots he does, and they are an essential ingredient to a room looking as 
pretty as it can possibly be....and so after it was over I put one of the arrangements on the 
dining room table and I just loved how pretty it looked in the room.
Flowers really bring a room to life.
 Colby has recovered from being neutered and is just being terrific.  He is getting more affectionate as he gets older, and his one year birthday is coming next week, so we will be celebrating with a steak dinner for all!! 
The other fun thing I did last week was appear in a short film that Matthew Mead is 
preparing for the Haven Conference in August.  Haven is a conference for bloggers.  Yup,
like most industries with their conferences, blogging has several, and Haven is a big one.
While I was in a lot of the film with Matthew, sometimes I was watching him
 shoot his bits, and so I filmed a bit of the behind the scenes.  
Wouldn't it be fun to see more of this?  
He is so much fun to hang with, 
and some of this will be on our next Youtube video. 
 Stay tuned for that...and the shed....
and Colby's birthday party!
 photo signature_zpsxi5q1w6r.png
Read more »

Friday, July 1, 2016

Courtyard and Shed Progress

We have been working on the outside, hubs in his heavy equipment and me on my sewing machine. 
Making new Sunbrella pillows and a special tent that will be revealed later...Oh, and I have been doing some woodworking too with shingling and more.  Hubs on the excavator and building his amazing walls~our worlds have combined to create a really nice space outside. To refresh~ the courtyard was expanded to gain six more feet and it has made a huge difference in how it feels out here. The old space was very narrow due to the rose hedge that confined the space. 
Rose Hedges along the Courtyard last Fall
The roses were killed off during the winter.  So with the roses now gone, Justin suggested we just extend the pea gravel to the edge of the new wall that hubs built. I was thinking I would have some kind of border, a cutting garden or boxwood or hydrangeas, but this idea has proved to be wonderful. 
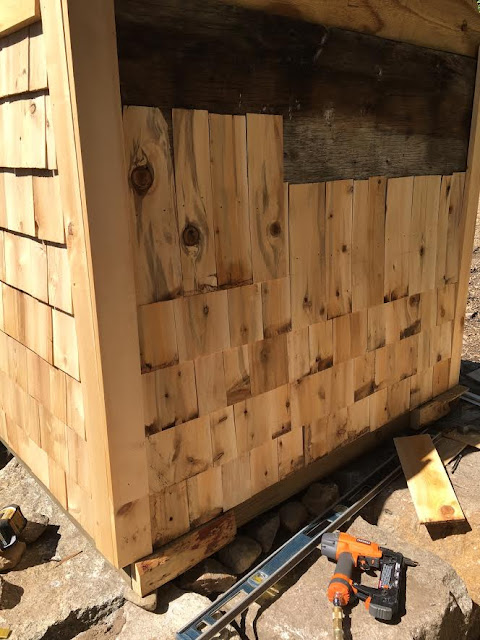
 If you look beyond the mess activity, you can see the new wall, as well as our saw table and "juice" lines leading up to the shed where we are busy rehabbing the thing.  Hubs has straightened it out, and Justin and I started to shingle it and now are almost done.  Shingling after a quick YouTube video and we did a pretty good job.  Its not that hard, and for most things you can find out how to do them by watching videos, why not?  Yesterday I tackled the right side and then the back of the shed, installing the trim boards as well as the shingles all by myself. Look how proudly it stands up on the ledge.
This is the shocking BEFORE pic of the "ramshackle shed". 
 Hahahah!!! OMG, I mean would you think it could be salvaged? 
 I thought it was worth a try.
We used all the inner boards but did replace the two side walls with new plywood.
Then we used the least expensive white cedar shingles at Home Depot to do the siding.
We will install the screen door I found at Brimfield last year, but never used.
For now the courtyard remains a work zone, but we hope to make great progress
during this weekend of the Fourth, as we have a "staycation" at home.
I also love the feeling of being under the umbrellas when outside, so I searched and 
found another matching white ten foot market umbrella.  The old blue umbrella offered shade
to us when we used the saw and I loved how it felt.
 Two umbrellas feels more festive and kind of like a resort!
I was lucky to find the same umbrella at the Christmas Tree shop, and at a great price too.
The ten foot umbrellas can be very pricey, but this one is a reasonable $69.95.
 The flags and buntings have come out to honor our nation's birthday. 
We will be firing up the grill for burgers and steaks, but rest assured we will
 be hammering it out on the old shed, so I can put the saw away and reclaim 
the space for the rest of the summer.
Happy Fourth of July everybody! 
I will be catching some Wimbledon action in addition to the grilling 
and the shingling~ makes for a great American holiday!
 An old sketch I drew up years ago of an imagined outbuilding is a bit 
grander than what I am rehabbing and creating now.  But it just inspires me
that I have been able to take such a crappy building and breathe life into it
to create the little garden shed I have always wanted.


Yeah, it was bad.
 And now its looking soooo good!
Don't you agree?


 photo signature_zpsxi5q1w6r.png
Read more »