Showing posts with label Annie Sloan. Show all posts

Tuesday, March 28, 2017

Gilding is so French!

 The antique Venetian mirror that I found on vacation has a gilded motif, and that
brought about the thinking of incorporating some gold accents on my French chairs.

 This lovely cane back chair with blue-grey paint and gilded accents captured the essence of what I hoped my silvery grey chairs could aspire to....although my chairs are not as fancy,  it is the "essence" that was the plan. Adding some dimension with stain over the cane backs, and then gilding the decorative details became an afternoon's project.
 Annie Sloan's Chalk Paint line has added gilding wax to the lineup, and it comes in five metallic shades, two of which are gold colors. I went with "Bright Gold" after comparing the two.  
This gilding wax will complement any furniture, so start thinking what you can gild!
 Gilding with gilding wax is much easier and quicker than gilding the old school way using gold leaf and sizing.  Simply rub on or paint on the gilding wax, using your fingertip or a small stiff paint brush, like the one I used. After squeezing a bit of gold wax onto a piece of wax paper, I traced around the grooves of the chair using the brush, as well as the floral detail on the chair back.
 One tip I have when using gilding wax and a brush, is to dip the edges of the brush into a bit of mineral spirits, then into the gilding wax, and then apply to the surface.  It is the same methodology of dipping a paint brush into water when painting watercolors.  It glides right over the surface, leaving a gilded stripe in its path.
After gilding the accents on each dining room chair, I took a chip brush and applied
some dark wood stain over the caning.  Applied right over the previously painted
surface, it gave the look of my inspiration photo that I had hoped to achieve. Some
chairs are more heavily gilded, and some spots are sparse, as if worn off over time.
The result is subtle, but noticeable, enhancing the dining room in that antique kind
 of Frenchy way that you all know I love.  The chairs have a sophistication that 
they lacked before, and yet at the same time they aren't screaming for attention. 
Using Annie Sloan's gilding wax is easy, affordable and yields great results!
Give it a try, and get some gilded goodness going in your home.


 photo signature_zpsxi5q1w6r.png
Read more »

Thursday, October 22, 2015

A New York state of mind: Fame or Fortune?


Two of my favorite creatives met for lunch in New York this week. 
 Matthew Mead and Annie Sloan.  Wow. 
 I was invited to go to the city with Matthew but I am sadly chained to the house rearing the new puppy.  I would have really enjoyed this meeting, as I think very highly of them both.  Annie inspired me so much that I opened shops to sell her paint and dedicated three years of my life doing so.  Most people know me in relation to her incredible Chalk Paint.  Shortly before I closed my store, I met and became friendly with superstar designer, author, publisher, editor, lifestyle guru Matthew Mead. 
 He has become a very close friend and we have engaged in many collaborative projects, with some new ideas in the works.
To learn more about this guy,  Matthew Mead, here is a terrific short video about him.
A talented man influenced by his mom.  Watch this video.  Compelling.
I feel I influenced my own son, exposing him to a lifetime of mixing business with art and design.
He has traveled further along down his own road now, and its been satisfying to watch. 
There were other interesting and amazing meetings that happened this week before Annie and Matthew met for the first time over lunch.  My son, Justin Power, was selected by a NYC producer to come shoot some segments for a potential design television show!  So he headed to the big city and it turns out they asked Annie Sloan to shoot segments as well as another Annie Sloan stockist from Kentucky, the talented Liz Brantley, of Liz Douglas Designs. 
 Here is a behind the scenes photo of Justin (before hair and makeup) flanked by Annie Sloan and Liz Brantley (after hair and makeup) and then on the left was a New York stockist, Amanda Preppard of Suite Pieces, who shot a segment, and Annie's sweet daughter in law, Lizzy Brown (R).  
Justin getting his makeup done...
(He is going to kill me for putting these photos on the blog.) 
 I would ask him, whats going on now??  (and then I would get a pic, haha)
I was stuck at home doing doggy care while he was being Mr. Hollywood! 
I mean I just turned down a six day HomeGoods photo shoot as their stylist. UGH.
 I was thrilled for Justin.  
Would he get discovered on a bigger platform and then everyone could see how talented he is? 
That is what I am hoping for of course.  And what I think will happen....
That night after the shooting, Annie Sloan had a book signing at a very hip shop, Verdigreen, located in New York's East Village.  Its so rare when Annie comes to the US and even more rare when she gets a chance to step inside one of her own stockist's shops.  
Word got out that Annie would be there and 
there was a large gathering there to welcome and toast her.
 Annie looked radiant coming from her tv shoot. Excited and adorable owner, stockist, Azie Shelhorse, beaming that Annie was in her very own shop.
 I've said it a million times, little business are so hard to pull off, and nobody works harder than independent retailers, like Azie and my son Justin, at his shop in Boston, Pioneer Goods.  These celebrations are lovely recognition, and it helps to drive more business to their shops, hopefully.
The same night that Justin was shooting his tv thing, and Annie was having her book signing,  there was also a book launch party for designer Tricia Foley, that Matthew was invited to.
Tricia is known for her white on white color palette and restful country home, which is the subject
of her new book, Life|Style.  I had preordered it so I got it when it was hot off the presses two weeks ago.  It is truly inspiring and got me thinking of emulating this simpler life style.
Matthew Mead has some of his stellar photography in her book.  As a matter of fact he thinks she 
is really amazing and tracked her down years ago. 
This video above was produced by Matthew when he visited Tricia in her Long Island, NY home.
Seeing people on video really gets to the heart of them, so if you are interested have a look. 
This week more than ever, I am struck by the fact that some people in my circles, the ones that follow a life path based upon their creative abilities, find validation in many forms like being published, or having their shops receive "Best of" awards....yet it hasn't translated into financial success or security for them.  It has been so interesting to see how some in this field can get leverage and find super success while others, equally talented,  are still working on gaining traction as far as the financial pay off where their creativity translates into the almighty dollar.  Tough to do, but certainly very possible, especially when their talent is through the roof.  Its a frustrating fact in this industry, and why I am happy to see good things happening right now.  I am encouraged when I see those who have success helping others find the same.  
Since I shared some videos, here is one of three that Wagner produced highlighting
me and Matthew doing our thing with their new sprayer.  
We look so profesh!! 
These videos are a work of art!!  You have to check them out!
Here is another one of our videos showing us painting chairs. I HATED painting chairs.
 I think I like this one best.  
Now know that we are  filming in 100 degrees inside his warehouse. 
 I think we did amazing, and look cool calm and collected!
My only regret is that I didn't start my Whole30 diet plan before I filmed
as I would have lost ten pounds and looked a little more Hollywood. Hahah!!
So while all these peeps were doing glamorous things this week, like book signings,
 and shooting tv pilots, and rubbing elbows with the NY jet set and drinking champagne,
I stayed home to rear Colby, my intrepid little pup.  
And cook dinner.  And do laundry.
But do not fear, I can't help but dream my creative dreams too.  
I have been working on some neat projects with the amazing Matthew Mead.
Now all I have to do is get this dog trained. 

 photo signature_zpsxi5q1w6r.png
Read more »

Friday, March 22, 2013

Using Transfer Gel ~ an Armoire Makeover


This is the "before" photo of the massive Chateau Armoire for sale in the shop.
It is a reproduction piece and had a peachy faux finish coated in a slick poly coat 
that just didn't suit my taste.  I came up with a makeover plan
for this big boy and it was going to be dramatic!
I planned to use my beloved Chalk Paint® of course,
and some new toys from Artisan Enhancements that we 
are excited to have in the shop now.
One of those products is the Transfer Gel and many people have expressed
interest in seeing a step by step account of how it works.
First thing I did was to paint two coats of French Linen Chalk Paint over the armoire.
 Because the transfer gel will work better on a lighter base color
 I painted the panels of the doors with Duck Egg.  My idea 
was for the armoire to have an aged Venetian feel to it~
so while it might look pretty simple
right now, it is not going to stay this way!  I had two images 
that I intended to transfer to the doors,
so I positioned them with a light pencil marking and then applied the 
gel to both the cabinet area where the transfer would be 
as well as to the face of the image itself. 
 Paint the gel right onto the good side of the image, not the white side!
Then position it onto the surface and using a plastic scraper 
(or a credit card) smooth out all the bubbles.  Some of the gel 
will squish out the edges, just wipe it away. You can see the 
dark areas of the surface that were wet be transfer gel. 
These will end up leaving a tell tale sign called a halo.  
I will address that later~!
 After you attach you images you need to use PATIENCE! 
Wait overnight for your images to dry completely and that means 
do some other stuff while you are waiting like Justin and I did~
we were playing around with 
all the Artisan Enhancements stuff while the day passed into night.
You will see it drying up~even if it looks dry, 
it still needs more drying time.
 Don't rush this part or you will be a sad artist.
The next day I came in early I was so excited...
  I was waiting for Justin 
to get to the store so we could start removing the paper 
from the images together! While I was waiting I started applying some 
other product, Crackle Tex, to the door and I
 will talk about that later too.
It was one more phase of the makeover.
Now we started to remove the paper~
we wet rags that resemble face cloths.
You need to be patient with this part too, 
be very gentle when removing this paper or you 
can scratch it off and have no one to blame but your impatient self!! 
 I used a sponge and Justin used his cloth and his cloth seemed 
to work much nicer than the sponge.  I had warned him 
so he was very careful, more careful than I was in fact!  
I had a few minor scratches and he had zero!
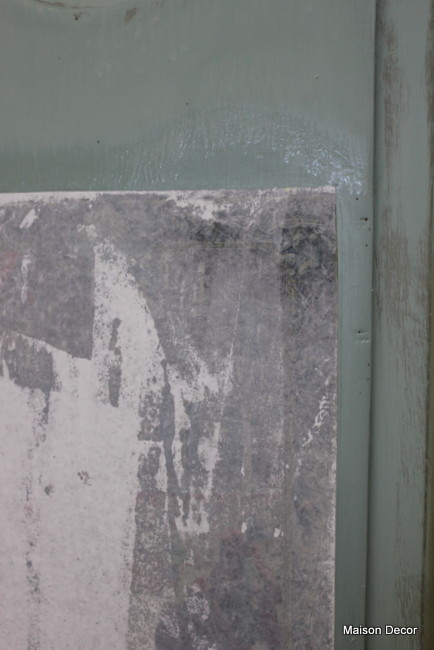
 The paper is wet and starting to rub off with the pressure of the cloth/sponge.
 See the bottom corner of the image is starting to reveal itself!
 You can see the bits of white paper that get rubbed off 
onto the floor or the edges of the wet cabinet. 
 More of the image is revealed with gentle rubbing~
All the pulp is pushed off of the image~do this slowly and carefully.
 Its so exciting when it is almost all finished at this stage.
 Still so much left to remove though.  
More rubbing...
and then when you think it is mostly all gone you 
stop and let it dry for an hour or so and look what happens:
All white paper appears again! 
So you repeat the process but this time  it is more important than 
ever to be tender and careful pulling the last layer of pulp away.  
Often you can just rub with your fingers when it is wet and it will 
roll up under your finger tips.  You can use a mist sprayer or a
 wet sponge and gently rub.  Let it dry again to see if you have 
any areas that still have white on them.  If you don't take it off it 
will mar your transfer~although when wet it looks clear, 
when it dries it can be clouded with white paper pulp. 
So go through this step 2,3, or 4 times to get it all off. 
 This is when I did a little damage~you can see a tear halfway 
on the right at 3 o'clock.  
But I don't care because I want mine to feel old and decrepit! 
 They are finally finished! 
At this point is when you might see a Halo effect. 
 That is a shiny shadow where the gel touched the wood outside of the image.
You can gently sand it back to remove it or you can dry brush
 or paint over it or do what I am going to do~cover it up with a texture.
I am now ready to go onto the next stage~
but if you were going to just do a transfer you could 
stop now and either seal with wax or Artisan Enhancements Top Coat sealer.
 The next step I took was to conceal the edges of the transfer
 so it didn't feel like it was just stuck there in mid panel....
I wanted to give it an embedded look. 
 So I used the Artisan Enhancements Crackle Tex to create a 
crusty cracked film around the image. How to use 
Crackle Tex will be coming up on another post.
 After the Crackle Tex I painted the remainder 
of the cabinet in a soft muddled effect
~dry brushing and washing my head 
off with Duck Egg and Chateau Grey.

 Then I broke out the Gilders Paste creating more of a Venetian feel. 
Purchase Transfer Gel here 


Photobucket
Read more »

Friday, March 8, 2013

Gothic Dresser in fabulous Olive Chalk Paint®!


 This fantastic old dresser with Gothic lines was painted
 in Olive Chalk Paint®.
 We wanted to use a bold color on this piece because 
it was so beefy and had great lines and details.  
 Action shots from our shop showing the first coat of Olive hitting the drawers.
 Take your drawers out of the dresser to paint them for the best results.
Paint only where the original finish was applied. Don't paint all along the sides of drawers or you will have sticking issues.
It will all get the standard two coats of Chalk Paint.
Justin in painting mode~you can see the top of the dresser here and our little box of Elmers wood filler.  If you have any deep gouges or ripped off veneer you can fill it in with this filler.  After that was done we planned to use the Rustic Technique to create a leathered weathered texture on the top surface.
 The top was done by my son Colin using the Rustic technique.  He did a fantastic job on it! If you have a piece with a surface that has "issues" like our piece~consider using the Rustic technique to your advantage. We teach this technique in our Annie Sloan Introductory course at Maison Decor. This old piece had veneer missing and a less than stellar surface on the top of the dresser as you could see above~the Rustic technique worked beautifully on this piece.
 All the details  like the chunky leg and the 
decorative trim are highlighted when you apply dark wax.
The leg without dark wax to enhance it~
see what a difference dark wax makes?
 Plenty of dark wax was used around the drawer details~and we revived the old 
hardware with Bronze Gilder Paste. You might use antique gold or silver if that is your preference.  I used some silver on hardware for a graphite dresser yesterday and it looked amazing with the dark background!
 You will see that later~
 A moody finish was created with the dark wax~
I could have used even more!
To finish up the dresser, all the drawers were lined with a timepiece motif decorative wrapping paper.  You can use these pretty papers to line old dresser drawers when they don't look so pretty inside. If your drawers have that funky smell you need to take them out and completely seal them with Zinssers clear shellac.  These drawers were fine, but they had stains inside.  You could paint the insides of the drawers, but since ours only had some discoloration on the bottoms, we chose to line them.
Each row of drawers has different hardware pulls which 
makes for a cool look.  They came that way from auction, and 
the hardware is all antique, so its hard to think it is not original.
Step outside your comfort zone and try a bold color on
a big piece with details and then apply your dark wax (after the clear of course) with a liberal hand! Buff it all up and step back and admire your creation!
This piece is being added to our online shop but is for local pickup
or you can arrange for your own shipping. 
But be forewarned~it weighs a ton...


Photobucket
Read more »