Annie Sloan
Creator of Chalk Paint decorative paint
Annie showed me many things~and it was a revelation.
Here are my Chalk Paint Tips.
Remember the Chalk Paint basics:
no priming, stripping or sanding
Tip #1
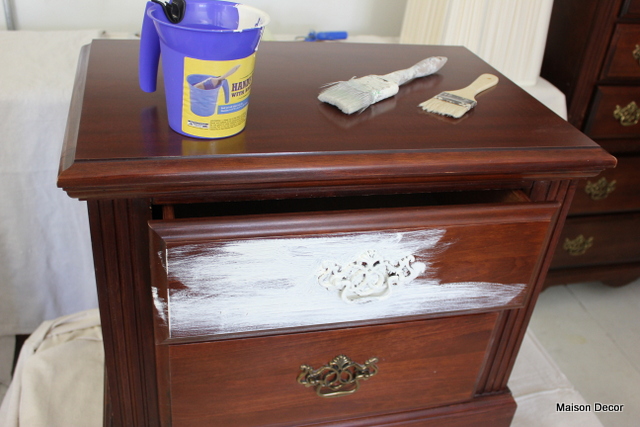
Assess your piece.
Usually you can just start painting. But read below carefully before you start.
Is it super shiny? If so I do go over my piece with a sanding block to knock back the shine. If I think it has been polished with furniture polish over the years, I will wipe it down with mineral spirits on a paper towel to dissolve any polish. Otherwise just start painting! Chalk Paint dries quickly so don't use repetitive brush strokes or you will get a rough finish. Long fluid stokes are best.
Load your brush up with the paint and use longer strokes across the piece,
trying not to go back and forth over your strokes as you can with latex and oil paints.
Adjust your style of painting: Longer fluid strokes.
Kind of shiny....and will need some clear shellac too.
Tip #2
No Prep!
You really don't need to prime or prep, unless its shiny. Also, if the piece has chips or gouges those are issues that need to be addressed as the paint does not make those problems disappear. If you have a piece of furniture that starts to bleed while you are painting (which means a discoloration comes through your lovely paint job), stop painting! Get a can of Zinsser Clear Shellac and go over the entire piece. It will dry quickly and then you can resume your paint job.
Tip #3
Use water on your brush for the second coat.
One light coat of paint, followed by a second light coat should be your protocol for most pieces of furniture. When you start your first coat, expect to see brush strokes and some of the wood peeking through. You might feel like your paint job is looking amateurish~but wait til the second coat goes on. You will look like a hero! Two light coats of paint is the rule, not a heavy gloppy first coat to try to cover the surface. When you apply the second coat I like to "kiss" the tips of the brush in a bit of water to help the second coat glide on smoothly. It makes a huge difference. As you are painting check the edges to make sure it is not running or globbing on the side you are not directly painting. I am checking constantly to make sure there is no buildup as I paint.
Tip #4
To Distress or Not?
After the two coats are finished, this it the time to decide to distress or not~if you are going to distress your furniture I like to do it before I wax. Its a personal preference. Go over the edges where it would be worn authentically with the passage of time. Resist the spotted look~a little bit here and a little bit there creates the dreaded Leopard look!
Tip #5
Wax for a finish
Now your piece is painted (and distressed or not) and ready for waxing.
Apply wax in sections of about a square foot at at time and wipe off excess wax with a soft cloth.
T shirts work great for this. Repeat until finished.
Use a wax brush to apply a coat of Annie Sloan Clear Wax.
Apply a small amount of wax by brushing the tips of the wax brush onto the wax and then apply to the surface of the furniture. You can also apply wax with a soft clean t shirt or rag.
Tip #6
Buff your piece
After waxing wait a few hours (or overnight) and then buff your piece to get a luster.
Buffing is underrated~it gives a terrific finish to your piece. You can buff with a buffing brush or a cloth.
Buff means to rub the cloth or brush briskly over the surface and you will see a sheen develop. It takes a piece 21-28 days for wax to fully cure, so until then use extra care with your piece.
Tip #7
Caring for your wax brush
If I am doing a lot of painting and waxing I store my wax brush in a neoprene (not latex) surgical glove. It keeps it nice and supple, ready to be used, even several days later. I don't like to wash my wax brush until I am finished with it for a period of time. Wash your brush with warm water and Dawn dishwashing liquid. It cuts through the wax nicely. Then I paper towel it off and shape the bristles together as I towel it off, then place flat to dry.
Tip #7
Dark wax?
If you plan to age your piece with dark wax, you want to apply it right after you apply the Clear wax. Don't let the clear wax dry first~if you do, then lightly wax again with clear wax, then apply small amounts of dark wax in areas that would look good with a patina. Apply dark wax with a separate wax brush, like the one shown above or a cloth. After you apply a small amount of dark wax, use a clean cloth and rub it around on the piece~continue until the piece is done. Do not use your clear wax brush for dark wax as it will cause staining and render it ineffective for creating a clear wax finish in the future.
Tip #9
Clear wax is a dark wax magic eraser!
Too much dark wax? No worries.
If you think your piece got too dark with your application, add some clear wax with a cloth and rub to remove the dark wax area you would like to lighten up.
Tip #10:
Mix clear and dark wax together
A combination of a little dark wax mixed with the clear wax on a paper plate and then applied can be an easier way to use dark wax. Try this to see if you prefer this method. Remember to always apply any dark wax over a fresh moist coat of clear wax.
Tip #11
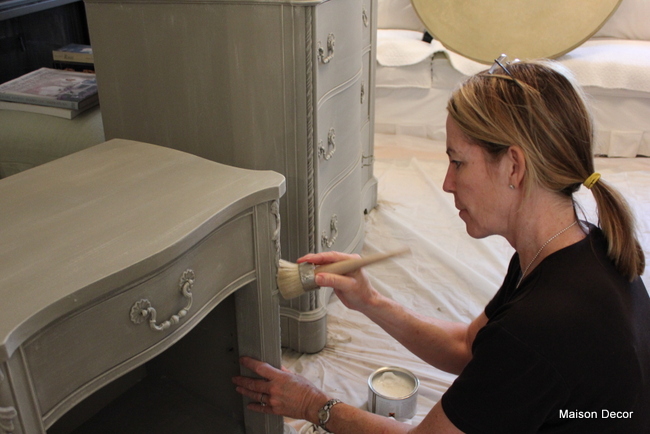
Dark wax changes the color of Chalk Paint.
The desk in the photo above shows Paris Grey. The greenish khaki area is Paris Grey after treated with dark wax...it looks totally different. I recommend making a sample board with your paint color, wax the entire thing, then use dark wax over half the section so you can access the effect of the dark wax.
Tip #12
Do not use wax on outdoor items.
Chalk Paint can be applied to front doors, home exteriors, bird houses, metal and cement garden statuary and more. The reason we don't wax is that the warmth of the sunlight keeps the wax from curing. Yes, you can paint a front door and wash it later on without a coating of wax!
Tip #12
Caring for your piece.
Do not use furniture polish on your waxed pieces. A damp clean cloth will do the trick. Smudges can be removed by applying a bit of clear wax and buffing out the spots. Over time surfaces can benefit from another a coat of wax, particularly on pieces that are getting rubbed down a lot over time, like coffee tables, kitchen cabinets and the like.
My kitchen in Old White with Clear Wax
Click on the comment section below to see readers questions and the answers
I gave in regards to their various paint and wax dilemmas.
QUESTIONS?
Scroll through the comments as you might find an answer to a question you have been wondering about.