Its been a long time since I have blogged, so I have a lot to share.
We have been busy little bees in our shops!
Justin's shop, Pioneer Goods Co, got the green light from the
City of Boston so he is up and running now too in Boston's South End
at 764 Tremont. Its been a long road, but that kind of explains
why there has been little time for blogging.
So this is some of what has been happening:
At Maison Decor in Reading we have been doing a little redecorating around
the shop. We started by painting our giant paint cupboard. Gina gave it a paint job
with Old White using Annie Sloan's Chalk Paint. This just gave it a completely
different look. The cabinet was painted in a brown color that was not Chalk Paint,
and after being asked a billion times what the color was, I decided it was time to
make it over using Chalk Paint. I love how it looks now.
Very cottage, a little bit Shabby Chic
and altogether, its lighter and brighter. We kept the Antoinette color in the background
where all the shelves are. Consider using a contrast color or accent color inside
your pieces that have shelves or interiors that are seen. Its an easy way to make a piece
look a little bit more special and custom.
Here is Gina going at it. It took her about one hour to do the entire cabinet.
One coat pretty much gave total coverage! I did some light distressing
and clear wax and a touch of dark wax to finish it up.
We have been doing some custom jobs as well, including this pair
of Victorian chairs. We are not painting the frames, just the upholstery,
They were chartreuse velvet chairs and the client wanted them in a rich royal blue.
Spritz the fabric with water then start painting. I dip my Annie brush into a cup of water,
then right into the paint can and onto the moistened fabric. We did two coats, painting
with the nap of the velvet. Don't try to completely cover the colored upholstery in one
coat. Be patient and do it two or three times using watery brush to lighten the weight
of the paint on the fabric.
Gina is laughing here, because I asked her to pose for this pic and had
her scrunch down...anyway you must work the paint into any tufted areas
or between any folds. Annie's paint brush is great for this!
This photo shows the first coat completed on the left.
See how you can still see bits of green coloration coming through the blue?
That is the way you want this process to work. It takes time, but results are
no expensive upholstery job required. After the painting is finished we sand lightly
with 500 grit with the nap, then wax with a 50/50 mix of Annie's clear wax and mineral spirits.
The resulting feel of the fabric will be like leather. I will show the waxed chairs next time I post.
In other big news for our little family business, Justin's shop is finally OPEN!!!!
Here is a shot of his Boston neighborhood shop. Little iron garden fencing surrounds his store. Its so cute and quaint looking. Its on the corner of a busy street and has great visibility. We hosted an event last Friday night, a Tintype Portraiture Event with itinerant traveling photographer Giles Clement, from Oregon. It was a smashing success! Follow along with a few pics below as I show off bits of the event.
As I walked in the doors, the place was already a beehive of activity.
Giles had set up a mini studio in the rear of the store.
At the back end of the store you can see Giles camera and there he is off to the left
pouring this solution over the piece of tin that will eventually hold the image.
Its super fascinating to watch in person. This couple is about to get their picture taken.
Here is Colin posing for his portrait.
This was his portrait! I love how intense these images look on the tintype. The eyes
seem to be the central focus of the image. We had a portrait done of me with my sons and dad
too, so it was three generations. Pretty incredible. And you only get one shot, its not like digital where it can be redone or fooled around with~Giles was great at capturing your group at the exact moment.
I watched him getting kids and dogs and groups...all with beautiful results!
The tricky part about groups is that the camera focuses on one plane, so Justin reads a bit darker being in the back. Even my dad looks darker in the front, while Colin and I are lighter. Very interesting process. You watch it develop right in a tub of solution before your very eyes.
This is Justin's portrait. So handsome and his eyes are just killer in this medium.
We brought Dillon in for the event as we wanted a true family portrait lol!
He was great! So laid back but in this pic looks like he was itching to get
inside to see what the hubbub was all about.
Posing with the dog was a bit of a challenge. We had to put him up on a piano
bench, then Mr. Maison Decor had to scrunch down to be included in the shot.
Dillon was busy looking all around, and so it's amazing that Giles captured him looking right at the camera! I think tintype is why the phrase "capture" was invented for photography.
So the party and event at Pioneer Goods was a bit hit!
Thank you to everyone who came out that night
and supported Pioneer and Giles Clement. Small businesses rule!!
We had lots of families bring their little ones,
and now they will have portraits that will last a lifetime and more.
Pioneer Goods is open Wednesday through Sunday from 11-5 at
764 Tremont Street if you would like to visit.
Follow along on Instagram at PioneerGoods
for all the latest information.
If you did you would know that Pioneer is also an
Annie Sloan Stockist and we just stocked up on Chalk Paint supplies.
Justin is also head of our Mora Clock division and he and his team have done an
outstanding job on getting clocks hand finished and shipped out to our clients.
Here is one in a Rhode Island home, photo courtesy of its new owner.
Our Maison Decor Mora Clocks have had such an upsurge in popularity
and we are excited people are loving them as much as we are!
This one is waiting to be picked up by its owner. Its rare that we actually have
one in our shop as we need to send them out as soon as they are finished.
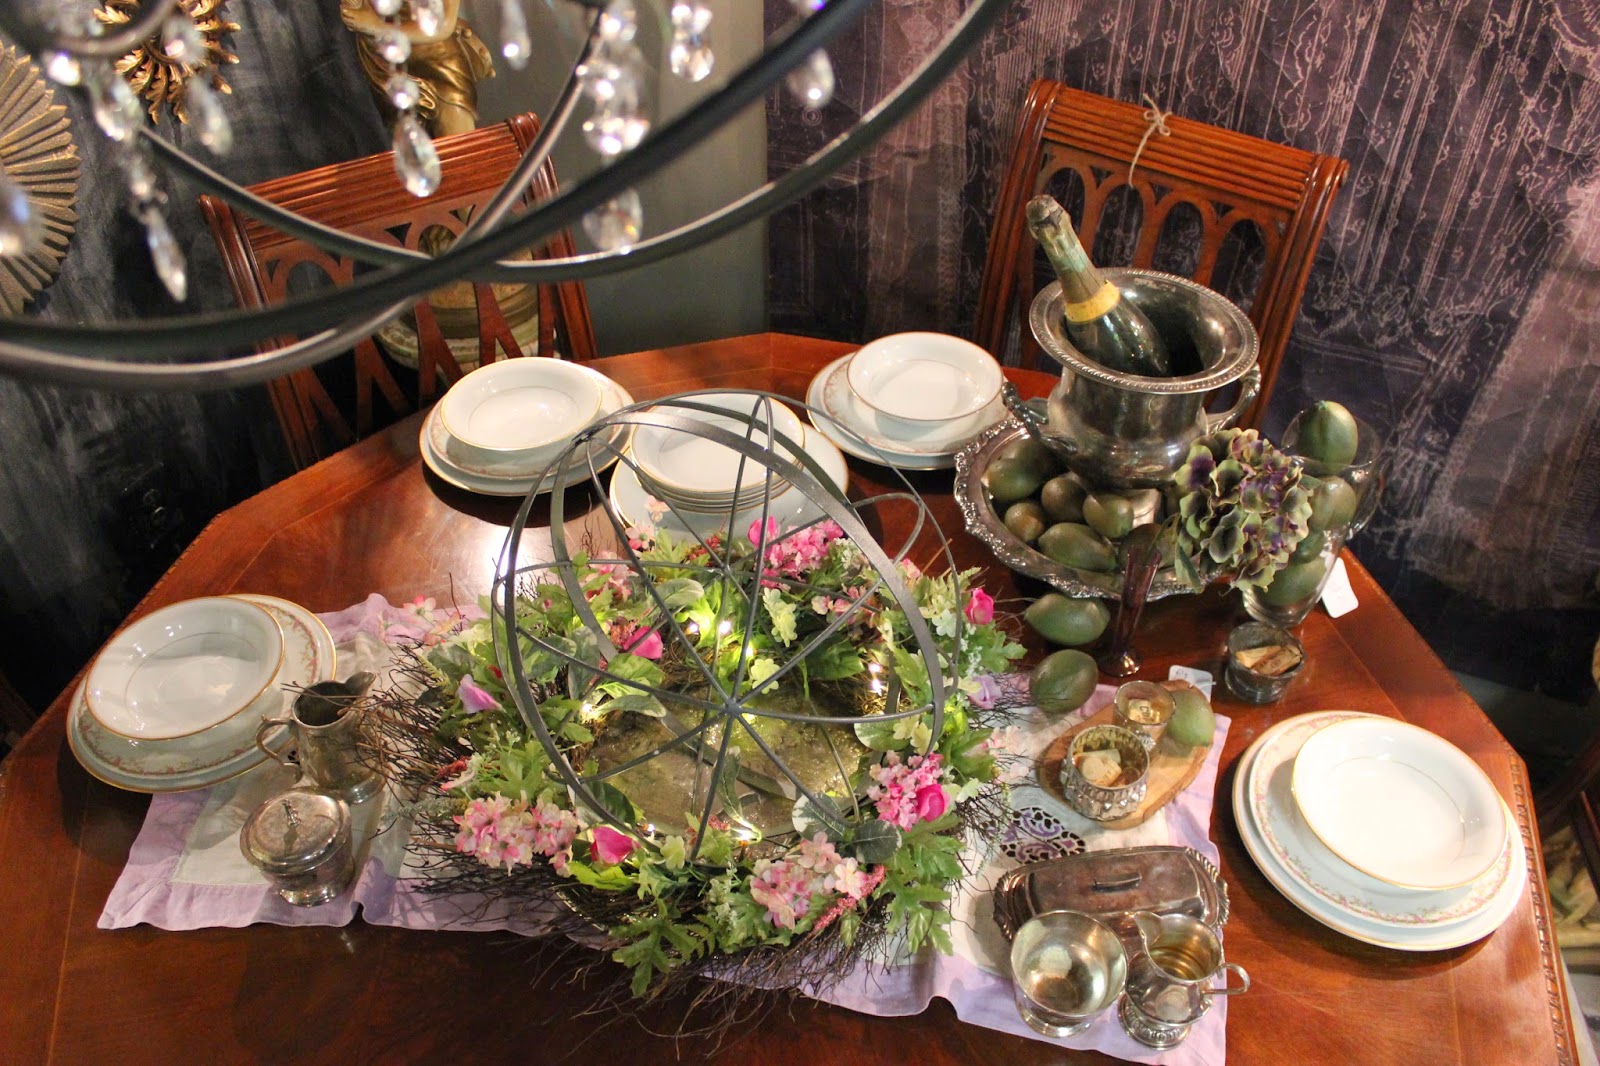
We had fun putting together a garden party dinner table setting in Reading.
Mix your vintage tablewares with modern paper cutlery placemats that we carry.
How fun is this? Its charming without being too granny.
Here are a few pics of a few more displays.
We mix in vintage furnishings like these in newly covered toile seats
with new items, like our Park Hill candle line,
for a refreshing and fun shopping experience.
There is always a new look in our shop and we cannot tell you
how many times we hear, "it looks so different in here"!
Our vignettes and accent pieces are ever changing and sometimes sell the day we put them out.
As you may know, I am a HomeGoods Pinterest Designer and this centerpiece was one I put together
using a HomeGoods metal orb with a HomeGoods floral wreath that has tiny little lights woven into the wreath with a battery pack.
I put them together on a vintage silver tray for a summery centerpiece.
Imagine changing it out with a twig wreath for the fall and some mini pumpkins tucked inside the orb. And then again at Christmas, refresh with some greenery cut from Balsam.
So easy to do and not a big expense either.
We have this great dining room set of 6 chairs and an octagonal table.
Its five feet in diameter and is getting a lot of interest~
most people love the idea of sitting at a round table.
We post our furniture online and you will see these pieces with their pricing there.
These are the latest additions to our shop~
watermelon pink velvet chairs. OMG, I LOVE these chairs!!
I don't expect them to last long, but who knows...
maybe its just me that loves them.
 Note: This post is partially sponsored by HomeGoods as part of my participation in their Pinterest Designer board, Happy by Design. Link above.


