Showing posts with label Toile. Show all posts

Monday, September 23, 2019

Pumpkin Punchbowl Centerpiece


 The first day of fall has arrived in New England, and so we say goodbye to our short lovely summer.
 The nights have been cooler and the days have been pleasant, but these nice fall days are
fleeting as well, and winter weather will be next.  But until then, lets dive into decorating for
fall.  I am not a big fan of too much fall decor around the house, but one thing I do
love are the pretty fabric pumpkins that are everywhere!  Over the last several years
I have either purchased them or made my own using all kinds of materials.
 For a nice and easy centerpiece I assembled them all in my silver punch bowl that I found at the Brimfield Antique Fair.  This punchbowl has been so much fun to use for centerpieces for the various
holidays.  Everything looks good in it!  This year I picked up some pink velvet pumpkins and a tiny blue floral pumpkin, both from contacts I have online on Facebook and Instagram.  My blogging and Instagram friend, Larissa Jenkins, has a cute Etsy shop and she sold her pink velvet pumpkins there.  Her blog, Welch House 1900, is on my sidebar if you want to visit her incredible old house 
and see the masterful decorating in the style of  Glamorous French Vintage style.  
The blue pumpkin I noticed on a Facebook post was being sold by the beautiful shop called Vignettes in San Diego.  I reached out and left a note that I wanted it...the shop owner quickly contacted me with her phone number and the next thing you know, 
here it is in my punch bowl like the cherry on top of a sundae! 
This was last year's thanksgiving centerpiece using many of the pumpkins I made myself,
and some velvet pumpkins I found at Homegoods. 
 We are having a party for my mother in law to celebrate her 90th birthday,
so I made a grand buffet tablecloth for our dining room out of a pale grey and cream toile.
The centerpiece looked really nice on the cloth, and I plan to use some of my vintage silver
trays for the party to give it that fancy vintage look I love.
Making my own pumpkins is a lot of fun, as I get to use leftover home decor fabrics or
I upcycle velvets from old clothing like jogging suits and fashion them into cute pumpkins.
Enjoy the links below for either making your own or visiting independent shops and blogs
that I find very inspiring! 

Read more »

Thursday, March 29, 2018

An aged pastoral painting inside the piano and Reeve


My French Piano and a slice of life. 
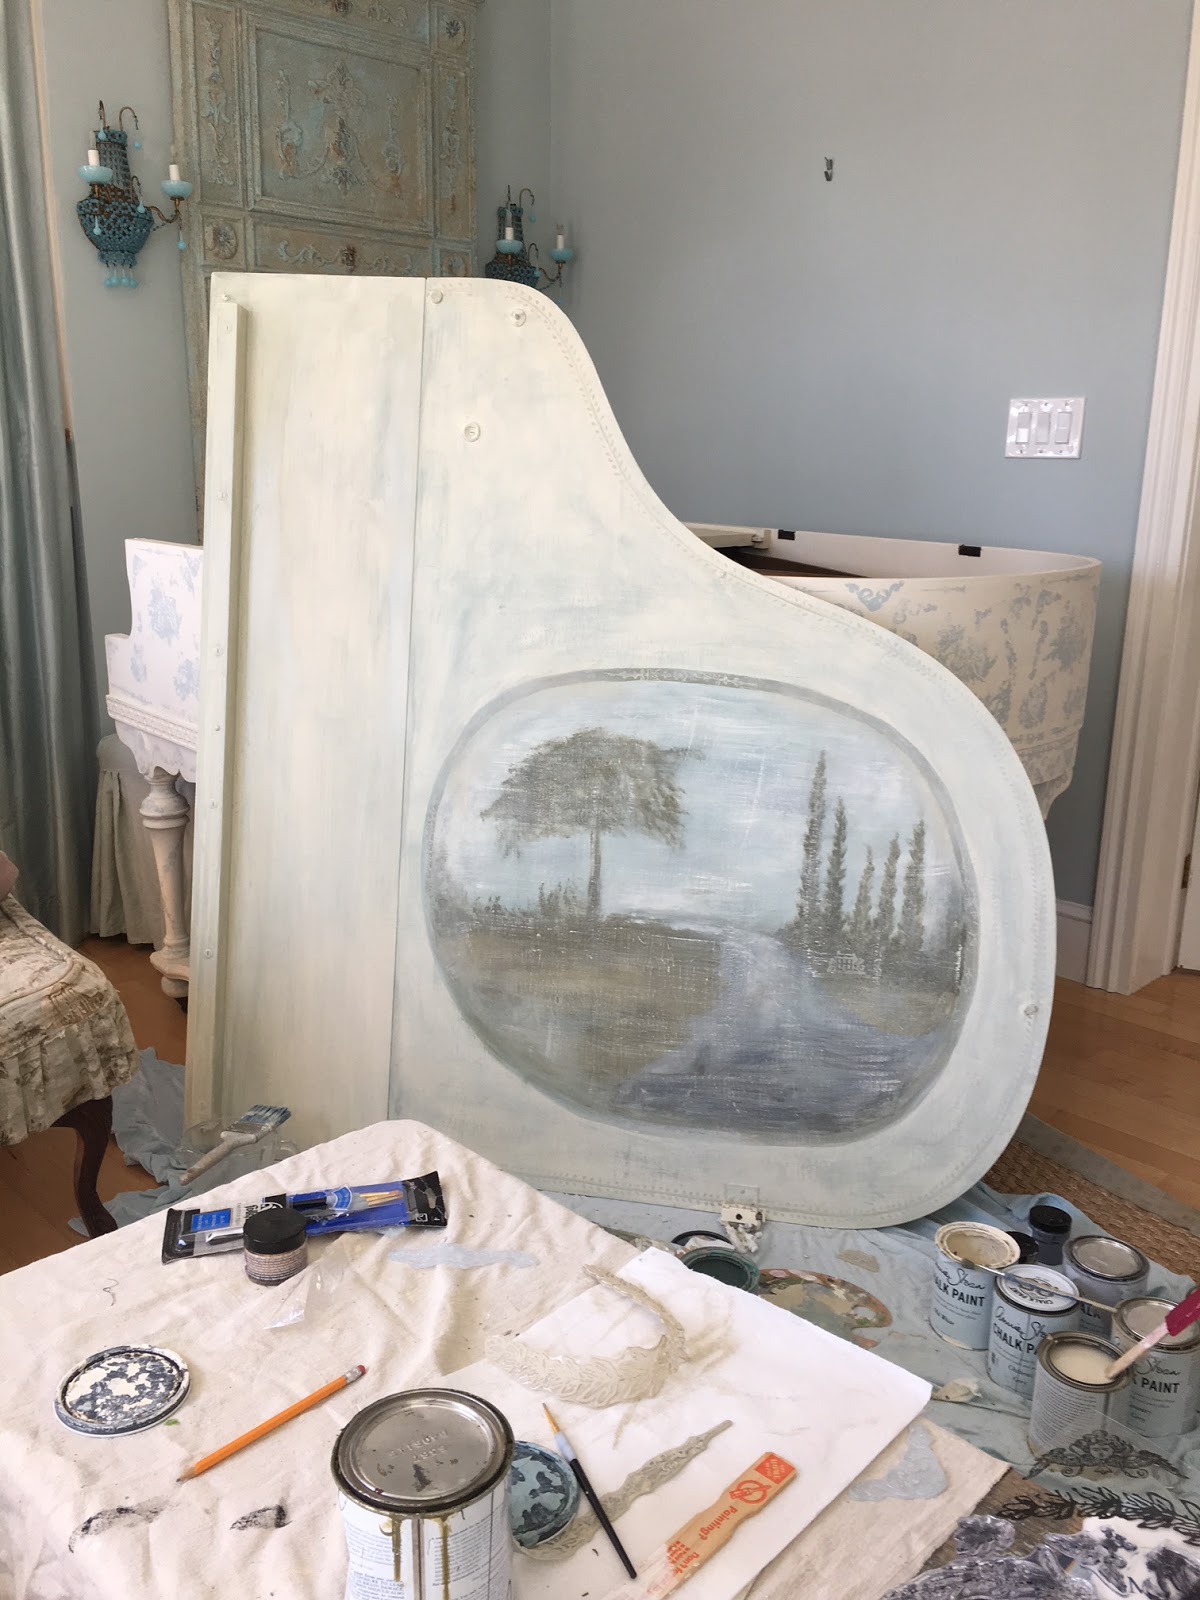
 Last post I showed off how I painted the exterior of the piano with stamps and a pattern to give it a toile effect.  But I still was unsure how I wanted to finish the interior to give it even more of a French look.   I had a few days in a row off from watching baby Reeve, and I decided to tackle the piano.  The thought of putting a pastoral landscape for the interior came to me as I went to sleep that night, as often many creative ideas do.  The next morning I got up and took the piano lid off its hinges and started to paint a landscape similar to the few that I have been painting around our home.
This pastoral landscape, my largest, was painted on a big canvas.  
Searching for the landscapes that I have painted to show you, I realize I 
may not have posted on them at all, so look for that post shortly.
Back to the piano...
I unloaded the cans of Annie Sloan paint I had and started to paint a scene
 from my imagination.  After painting the landscape, I brushed white paint 
over the whole thing to give it a dreamy look.
The painting took me about four hours and I was thrilled with the results.
It was soft and elegant and old looking, something out of an old painting from
 the French countryside.  It is really pretty now that it is all finished! 
I wasn't sure if I should gild the edges, but for now I don't feel it....
and I always say: Doubt means Don't.  At least for now.
 My life is more balanced towards a family life these days, and when I get a chance
to do something creative its all the more enjoyable and special.
Reeve is nine months old and is such a JOY!
The weather has just started to creep into the fifties in Boston, and you can see the baby
carriage in the dining room all ready for afternoon walks with Piper.
 Piper and Reeve are such a great pair! 
 They both look forward to being together, and they are side by side most of the day. 
 Piper is so gentle, and its true that Goldens are great with kids!

 photo signature_zpsxi5q1w6r.png
Read more »

Monday, March 26, 2018

My Painted Toile Piano


Some of my most creative ideas come out of the blue like a thunderbolt,
like the random idea to paint my white piano with a toile pattern.
After watching some amazing makeovers using a stamp product line created by
Iron Orchid Designs, I was interested in trying it out, but wasn't sure where.
After repairing a leak in the ceiling and repainting the wall, I just thought to myself
I would use up more of the wall paint on the piano with the stamps from IOD.
 Stamping is a way to create a one of a kind personalized decor effect on
walls, furniture or fabrics.  I watched several of the videos from the IOD website
and found myself becoming so inspired to create something using a stamping method.
After purchasing two packages of different patterned stamps for IOD retailers (see below for links)
I created a toile pattern that fit the shape of the piano, kind of winging it as I went along.
 Because the paint is the color of the walls, the overall pattern is restful, instead
of busy.  I couldn't be happier with the result, and it only took me one day!
Mr. Maison Decor is away on a trip, wait til he gets back....
I actually don't think he will notice for a few weeks.  Then he will say
in a surprised voice, " When did you paint the piano!??"  
Our living room had been in disarray since the leaking ceiling, and tonight
he will get back and check the wall and ceiling that I finished up after his repairs.
And there will sit the Toile Piano, unnoticed.
But for me, she is a SUPERSTAR, and I am in LOVE with her!!
My son took a brief 15 second video of me applying one of the stamps
to the border of the piano.  Click the big arrow to watch.
Here is a photo showing the top a little bit better.
Is there a toile piano in your future?

Check out Iron Orchid Designs HERE
Retailers where I purchased my stamps:
Kathie Lee Jordan Designs (Canada) HERE
 Collette's Cottage (USA) HERE
Wall Paint used for Stamps: Ben Moore Woodlawn Blue
White Piano:  Annie Sloan Old White Chalk Paint

I used a combination of stamps from the Laurel package 
and the Pastoral Toile package, along with a large stamping block.
Due to the curved shape of the piano, I applied many of the stamps feehand,
and some of the prints were a bit muddy and not as clear.  But it didn't
effect the overall feeling, and after the paint dried, I sanded the entire paint job
with 220 grit paper to soften the overall look.  


 photo signature_zpsxi5q1w6r.png
Read more »

Monday, January 23, 2017

Today's French Country Style

The lovely French Country style can work in today's modern homes.
This style has fanciful elements mixed with things to take it down a notch,
making it a nice livable style choice.  Mixing in some rustic pieces is the secret
to getting the right mix for French Country style, so you don't feel like you live
in a museum.  Its a style I have a passion for, and I hope you enjoy this post.
Let's take a look at some rooms that have the perfect mix, in my opinion.
Pamela Pierce Design
Everything about this room has wonderful French Country style for today's living.
Rustic and feminine meet to keep the room welcoming to both sexes.
 This home had the stone walls that set the rustic tone, so softness and femininity was added with fabrics and flowers. Look at the accessories: a pillow with an antique toile remnant, a green metal garden dining table used as a console,  old books, weathered finishes on the chair, lamp and shutters, and crocks and vases of a single type of bloom speak to an easy country life style, which is what French Country style is all about.  Bravo Pamela!
Veranda Magazine
A slice of a view of this room from Veranda magazine shows
a monochromatic scheme in camel and white.  The traditional checked
fabric keeps things approachable and the burlap drapery panel along
with sisal carpeting gives the room it's rustic elements. This room is more
French Country Cottage, as most of the design incorporates simple pieces,
with no gilded or fancy accessories anywhere in sight.
Traditional Home Magazine
A beautiful living room with doors that open out onto an 
inviting courtyard has the ubiquitous checkered
curtains flanking the french doors as well as on the upholstery.  
Lots of rustic elements from the walls to the grass rugs and the
 country style accessories make this room a great example of French Country.
It is decorated simply with well chosen accent pieces.
Pamela Pierce Design
Every thing this Texas designer does, I love!  
Pamela Pierce's trademark look is a feminine french style and she
balances it out with an old rustic ambience.  The stone walls create a nice setting
 for the painted rococo table and the slipcovered sofas in linen.  
Her signature is the ruffled slips that you will
find in many of her rooms on sofas and chairs.
 The lavender fabric makes this room light hearted and fresh.   
Veranda Magazine
Grey is the color of the decade, and here it is used in several shades on the 
wall paneling to great effect.  Black and white transfer ware plates
are hung all around the room, a  great French collectible indeed.
Another set of checkered draperies keep this room in the French Country style, 
as you might imagine fancier silk draperies would set a different tone.
The mix of painted chairs with the wooden table is another way this room keeps
to it's French Country style.  The iron lantern light fixture keeps the formal feel
of the furniture from becoming too precious.  I love the mix in this room.
Source Unknown (Pinterest)
This is such a great little banquette dining nook done in French Country style.
A built in library effect was created with flanking bookcases 
and then the area done in mirror behind the built in to visually increase the space.
What gives this room successful FC style is the use of the tan and white buffalo check on the painted French chairs, and the overall tone on tone color palette.  A painted chandelier hangs above a painted
table, and then a random French chair in dark wood is added to take away from the matched set.
A comfy banquette in checked and solid linen pillows makes it quite a charming spot.  What a nice
way to outfit a less than large eating area in a smaller home, townhouse or condo.
French Country style has evolved from this look, where there was tons of color and pattern everywhere you looked.  Toile fabrics, painted furniture and coordinating fabric patterns where once the way to create the "French Country" room.  Now it is a "less is more" kind of look, using some of these elements, but not all of them together.  A more subdued interpretation of this beloved look is a modern way to use French Country style in one's home.  Imagine this room without the curtains, just the shutters.  The table without the cloth, and that the table would be an iron garden table or a simple rustic pine piece.  Painted chair with checkered pad is perfectly fine as is.  Strip the wallpaper and use a neutral white or greige paint on the walls.  Finish it off with an antique French mirror  flanked by some of the transfer ware plates, over the painted blue sideboard, or use a Swedish style plate rack.  Now that would be an easy room makeover with stunning results!  Do you have a French Country room that could use a little updating? 

 photo signature_zpsxi5q1w6r.png
Read more »

Tuesday, November 29, 2016

A Gilded Pink Toile Christmas Table

Its all about Holiday Entertaining in today's posts (and all week long)
as part of Designthusiasm's Set + Style blog hop.
A special welcome to those who have just arrived from
my friend Courtney's ever gorgeous French Country Cottage!
But before we begin...
Can I just tell you all that I got my copy of this magazine
yesterday in my mailbox?! That is my living room on the cover!!
The COVER!! (Yes I am yelling.)
Ok, ok.... Just had to share.  I am over it. (Not)
Now back to our gorgeous table features.
Pink and Gilded and Toile for Christmas?
Yes. Yes. And Yes!
Why not use one's favorite things at Christmas?!
 Christmas means its the perfect time for fantasy and fairytale decor.
 Small twinkling trees are the perfect way to set the mood.
Layer in some of your favorite things with a bit of whimsy for good measure,
like these tiny white angel wings that I found at Joann's fabrics.
They came in pink too, and would have been so pretty....
But I wasn't sure then how I was going to use the little white wings when I bought them.
(The point being:  if you see something that captures you, buy it.
You will find a way to use it, I guarantee it.)
 Gold always elevates the mood, doesn't it?
 These striped gold and white candles 
(a knockoff of the high priced lovely Ana Candles that I have in my sconces) 
were a happy find at Marshalls~a box of six for the same price. 
Gold lusterware salad plates set atop gold rimmed dinner plates,
all vintage finds from various New England shops. 
Pink and celery green toile placemats were a set I made years ago
when I couldn't find what I wanted. They add a feminine French touch.
Repousse candlesticks in silverplate are new additions from a charming 
vintage shop in Dover, New Hampshire, called Just The Thing.
 A pair of grocery store topiaries were transplanted to some self-watering
 cache pots for a finished look. Rosy red cranberries were sprinkled about on the table,
inside the vase, and on top of the topiaries potting soil.
Grocery stores have so much goodness for decorating these days!!
And if pink isn't your thing....
think how easy it would be to change out the pink elements for red or white
if you wanted a more traditional Christmas look. 
Happy Holidays to you all, now let the parties begin!
Head on over to the wonderful blog of Sand and Sisal who is next up
on the tour.  Then check out the rest of my design blogger friends 
to see their special Christmas tables, it will certainly put you in the mood!
++++++++++++++
holiday-entertaining-logo-r
 coastal-decorating-for-christmas-tips-shabbyfufublog
lantern-candle-snowglobe-christmas-tablescape
french-country-cottage
maison-decor-xmas-entertaining
 sand-and-sisals-christmas-tablescape
tcl-deer-table-setting 
If you missed Monday's posts:
monday thumbnails
Coming Wednesday
Coming Thursday
Coming Friday


 photo signature_zpsxi5q1w6r.png
Read more »

Wednesday, February 10, 2016

How to Reupholster the Easy Way: My French Chair

Welcome to my tutorial blog post on how I reupholstered this second hand
French Provincial arm chair. I took lots of photos at some points, and less at other
points during the process, but hopefully this tutorial will inspire you to give it a try
and not be intimidated to attempt reupholstering.  I have never tried it before, and when
I scored this chair at an antique/vintage shop, I didn't love the fabric, although there
was nothing wrong with it.  After giving it some thought I didn't see why I couldn't just go
over the existing fabric with the new fabric.  So that was my plan, and the only thing I 
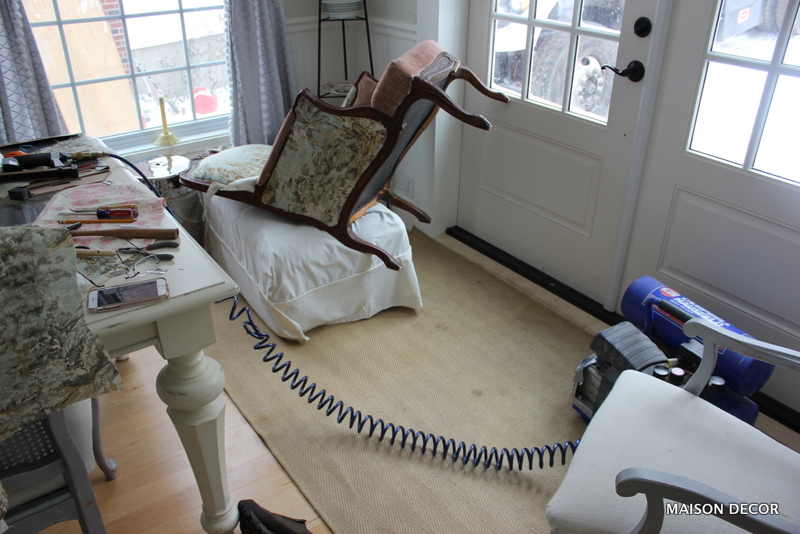
will tell you is that you must buy or rent a pneumatic stapler that gets powered from being 
attached by a curly stretchy cord to a small compressor.  This nailer/stapler will shoot the 
staples into the hardest of wood with barely a squeeze of the trigger.  The staples are tiny
and I used a 3/8" size staple for this project.  A regular stapler will not work.
For fabric, I ordered 7 yards of a toile (note: this was plenty of fabric for both pieces)  which I figured was going to be very easy to use, pattern wise.  Stripes and checks would likely be harder as you have to kind of pay attention to matching the pattern when you put it on the adjoining sections of the chair. This chair would be kind of easy to do because its parts were all like little islands that would have their own pieces of fabrics stapled onto
the independent sections.  So here we go~lets get this thing upholstered!
 Here is the chair, and is shown after I took the seat cushion off of the chair. 
 This is a photo of the compressor and the nail gun. It plugs into any household outlet. You will see Colby in a lot of these photos as he was relentlessly watching and sniffing around as I did the project.
 When I bought the chair, it had never been finished with the cording or trim that would normally have been attached to hide the staples.  This was what really inspired me to think about just stapling more fabric on top of the existing fabric.  See the tiny staples? They are all along the border of the fabric. I will leave them there and just lay some fabric over it and do the same thing.  But I decided to start on a less conspicuous area in case it was harder than I predicted. If you have a chair that you want to do this to that does have the cording or trim covering the staples, then pull it off and remove it using pliers or just pull it off.  Then you will be able to start at the same point that I did on this tutorial.
 I cut a piece of the toile and laid it over the side panel of the chair.  Then I put in a staple at the middle of the top and bottom, and left and right borders to center and anchor the fabric.  Then I just started firing staples in a row a few to the left, a few to the right, a few up and a few down...

 Give yourself a few extra inches of fabric all the way around so you won't be short. This was my first panel that I stapled and one side was very close to the edge, and it was too close to comfort.  I cut the rest of the pieces a bit larger after that.  Here you can see the staple gun nose hitting the fabric.  I can feel the wood border of the chair frame and by running my finger over the fabric, I can feel where to fire in a staple.  
After putting in the staples, which are side by side, you will trim off the excess fabric as close as you
can to the staples themselves. I started off using scissors to trim, but switched to a straight edge razor
to get a close trim job.  
 And just like that, the first panel was done, and it only took about ten minutes! 
 See how the fabric is trimmed very close?  Its a bit ragged looking but this will all be covered with a decorative flat braid called gimp, which will be applied with glue.
 The fabric is nice and smooth and held in place by one million staples on the edges.
 Now that I am feeling confident, I cut a piece of fabric for the center back.  I wanted the toile pattern to be featured on the back, so I cut it out accordingly.  Solid fabrics would be the most simple to do of course.  I fired in a staple at the North South East and West points on the border and then worked out from there. 
Here you can see there are more staples along the sides than there are at the top and the bottom. I did the sides a bit more, next did the top border and then finished the bottom border along the chair frame.
 After all is stapled along the edge of the frame, you trim off the excess with your razor or scissors.  I laid the chair on its back on top of an ottoman so I could work on it with ease.
 I had a few tools on the table, which I didn't need to use often.  A needle nose plier helped pull out any staple that didn't go in all the way, or bounced back leaving a sharp end exposed.  I also had a tiny tack hammer to pound in any staples that didn't go in as far as they should have.  

 I did the small area on top of the arm, which was super fast.  Then I did the inside panel.  See how the fabric is just laid over the arm?  I am deciding where to trim it so get the pattern where I want it.


Then I started stapling the borders.  I recommend putting a staple in at the top and bottom borders to anchor the pattern, and then again on the left and right sides if it applies.  After that you can quickly just start stapling the rest of the border until finished, with your staples side by side.  
 For this area in the "armpit of the chair" where the joint meets and you don't see a wood frame, feel in the area with your fingers to see where the wood frame is hidden in the recess.  Then push your fabric into the crevice, but turn an inch or so back on the fabric (look at next photo) and shoot a staple in there.  Easy peasy! Anything that seems to make sense is probably sensible, so I followed my gut on reupholstering this chair whenever anything wasn't clear as a bell. 
 Some areas that wouldn't have gimp trim will need you to give it a finished edge, and you can do this by simply folding the edge of the fabric underneath before you staple it in place.
 Then continue stapling...
 Then trim off the excess.  See the pink fabric underneath?  Its going to be ok, because that will be hidden with the decorative gimp trim.
 Sometimes I used scissors, sometimes the razor, to trim the fabric.
 Woohoo! Look how fast this thing was getting done!  It really was moving along quickly.
 
I finished all the little panels and now I had to deal with how to upholster the decking area.
The decking is the area that is hidden under the seat cushion, but then there was the part that was upholstered and attached to the frame.  I made a three section piece of fabric to fit this area, and I would say that this was the most difficult part of the project, as it involved the sewing machine and doing some fitting.  I will try to explain it as best I can to you.  I know how to make slipcovers and so the technique here uses some of that know-how.
 Lay the fabric ( I kept mine on the bolt so it wouldn't wrinkle) across the front part of the chair, and in doing so, I knew I could cut a piece straight across that would fit from where the arms join the deck to the front of the chair where the fabric gets attached to the frame.  Each chair will be different and you will have to devise your own home made pattern to how to cover your decking area.
 After cutting a length of fabric, I turned it face down and got my pin cushion and created darts at the right and left hand edges/corners of the chair.  A dart is just making a triangle to take up the extra fabric so you can turn the corner with ease.
 This is a dart.  I pinned from the corners to the edge of the fabric and it got wider as it moved away from the corner.  
 Colby was in the mix all along the way, so if you see Mr. Pumpkin Head chewy toy in my shots, that is why.
 This was the right hand dart I made to fit the fabric to the edge of the chair. 
 Here are both darts pinned.  Just pin up the excess fabric and then repin it if you feel it doesn't seem to fit correctly.  This is something I learned to do in junior high school sewing class making simple clothing, like A-line skirts.  Don't get scared at this part, just try it, and retry it and then check it by flipping it over and putting back over the front of the chair.
I flipped it right side over to see how it would look.  I was seeing if my darts had taken up enough of the fabric to fit snuggly but not too tightly.  Remember we will be stapling the front area and if the darts aren't taking up enough fabric you will have extra fabric to staple, which you want to try to avoid because it can look bunched up. Ok, my fabric fits pretty good, after I did this check, so now I take it off and bring it to my sewing machine and stitch a line right where I put all my pins on the dart.
 This is the stitched up dart. 
 Now cut off the triangle of fabric that was created when you stitched the line.  Leave yourself about 3/8" or 1/2" of fabric so you can iron it out flat.
 Cut the fabric and then make a small cut to the point in between the seam so you can iron it flat.
 I stitched both darts, trimmed them and ironed them and then put the piece back on the chair to see if it fit nicely.  Nice enough!  You can see there is excess fabric on all sides of this piece.  That is good.  All we were trying to do was to get this piece fitted over the front area of the chair. 
 See how it drapes over the "knees" of the chair?  Very good. And see how ragged the top edge of the fabric is now that the darts were added?  I will trim this off in a straight line, and this doesn't have to be perfect.  Just trim it up kind of straight.

 I left it in place, and trimmed it out straight. The sides are still just loose with lots of extra fabric hanging off the sides. Ignore these for now. See the white fabric on the existing decking area that shows the manufacturers label?  Well we are now going to cut a piece of fabric for that area.  You can use a piece of lining or other fabric if you want to save your good fabric, but I am just going to use the same toile fabric as I had plenty of it.
 I cut a large enough rectangle and pinned it to the decking front piece with darts.  Put your fabric right sides together and then pin in place. This piece of fabric you are sewing onto the front edge fabric has to cover the white area you see, plus have enough to tuck into the crevices.
 I flipped back the second piece of fabric that is now pinned in place to the front fabric.  I will only sew the one pinned edge (which is the edge we trimmed straight with our scissors).
 I stitched it at the machine then ironed the seam flat, then brought it back to the chair and laid it in place.  The fabric has plenty to get tucked into crevices on the left and right.
 In the back I will trim it straight across to attach the third piece of our 3 piece decking pattern.  Two down, one to go!! We are almost finished with this part!

The last piece of the three piece pattern will need to be cut to come out through the chair back and get stapled onto the bottom back side of the chair frame.
 This chair has a space on the bottom area.  Assess your chair and then look at where the existing upholstery is stapled, or just folded or stitched.  It is kind of like a blue print for what you have to do to your own chair.  Not all chairs are going to be the same, and remember, this is the FIRST time I have done this.  But fearlessly I plunge ahead, as I can sniff the finish line!! 
 I measure roughly and cut a rectangle of fabric for my third and last piece of the decking area.  Above you can see the seam line where it was stitched and then ironed open in a flat position.  You want to iron all seams because it will lay flatter and look more professional. You can also see the left and the right raw edges of the second piece of our pattern, just laying on the chair.  It is all still getting fitted, nothing has been stapled yet.  We are making the pattern and fitting it before we staple in place.


 After the third piece is attached, I laid it all out and fit it at the "knees" (the front corners where the legs are, by placing the darts over each knee.  Then I took a flat wood spoon (or spatula) and I shoved the fabric through the very small opening so it would fall out over the backside of the bottom of the chair.  That is the area where the third piece of fabric will be covering the upholstery.  
Now the back end of the decking fabric is seen over the bottom area of the chair.
 I fold under the raw edge, about an inch or two to prepare it to be stapled onto the bottom of the back frame. Now move to the front of the decking and start stapling there, saving the rear back part for last.
 The left and right sides of the crevices (the interior upholstery cracks where sides meet the seat) parts of the fabric are still sitting on top of the decking. That is ok.  Lets just start stapling the front along the frame and get the corners stapled around the knees. Then we will deal with crevices after that.

 Staple from the center out a few staples in each direction.  Then move to the right corner and smooth it out and add a staple and do the left side as well.  There will be a little excess fabric at the corners and you will make a nice little fold, one on each side of the knee and staple in place. Watch how to do this part.
 As you come around the front corner, turn the fabric back on itself to create a finished edge, as there are no staples adding along the area where the base of the arm frame meets the front corner.  All you have to do is EXAMINE your chair for staples, and add them where you see the old upholsterer added them. COPY what you see!  I always imagine what the next couple of steps will be, before I add staples, so that way I don't have to pull any out to start over. 
 The fabric above is just folded and laying close as it can to the arm frame. Now I will add my staples to the bottom of the frame, and this folded fabric edge will be held in place by tension.

 The left corner is all stapled in tightly, and you can see there is a little tuck of fabric on each side of the corner/knee area, which is where I took up the excess fabric. (Note that there are no staples on the left folded piece of fabric, and the fabric is held in place nicely without them.)


 See the little pleats around the knee that is created by folding extra fabric and stapling it in place? You will see this a lot in upholstered pieces.  After stapling the bottom, I trimmed off the excess.
 Now I am going to fold under the edges of the crevice fabric pieces and then take my flat wooden spoon and shove it deep into the crevices! Look how good the chair looks already!

 At the very back that third piece of the decking pattern has been pushed out and is dangling off the back.  You can see the gap between the frame.  But the next step is to fold under the edge of each crevice fabric and shove in deeply then anchor with a few staples.
 Look how smoothly the front of the chair is looking!  Don't worry about the raggy threads we can clean it up later when we apply the gimp.


 Colby was really starting to put his foot down...he wanted me to pay attention to him, right when I was trying to finish the decking inside edges.  
So I didn't take a pic of it cuz I had to shove the fabric in with the flat spoon and staple it before he could stop me.  Just insert the fabric in the crevice as tightly and smoothly as you can, and try to have the raw edge turned under when you shove the nail gun deep into the recess of the crevice.
At this point I had to take a break, because someone wasn't happy.
He really wasn't happy.  Enough was enough. Haha.
Anyway, the chair is just about finished. I did the back side and stapled that 
third and last piece of the decking pattern onto the back frame and trimmed it.
For the cushion, I cut out a slipcover style pattern, as most cushions are not upholstered,
as much as they have slipcovers with zippers.  I stitched that up at the end of the day
and then I made a ruffled slipcover for the matching ottoman.  
 The reason I made the slipcover was two fold.  Number one, the ottoman had a cushion attached to the base and I couldn't figure out how to staple it on without taking the entire thing apart, and removing the existing pink fabric. With a slipcover I could just fit it over the shaped ottoman and if I added a ruffle it would still expose the curvy legs.  The second part is that I can launder it if needed, and that is where Colby usually sits when I am on this chair.  I made small pleats along the edge of the ottoman slipcover to give it feminine dressmaker details. 
I will add to this tutorial when I add the gimp, but that won't be for a week or two...
I have to say that reupholstering was way more easy doing it this way, and I think
if you aren't a total perfectionist, you would be thrilled with the results.  By the way, this took me one full day, but I did it in two, because of my puppy Colby. 
I love how it came out, and if you have a chair in good shape, then maybe this method will work for you too.
Oh, and for those interested, the name and brand of the fabric is Covington, Bosphorous, in Flax.  


 photo signature_zpsxi5q1w6r.png
Read more »