Friday, April 4, 2014

Floral Bookcase Backings and more


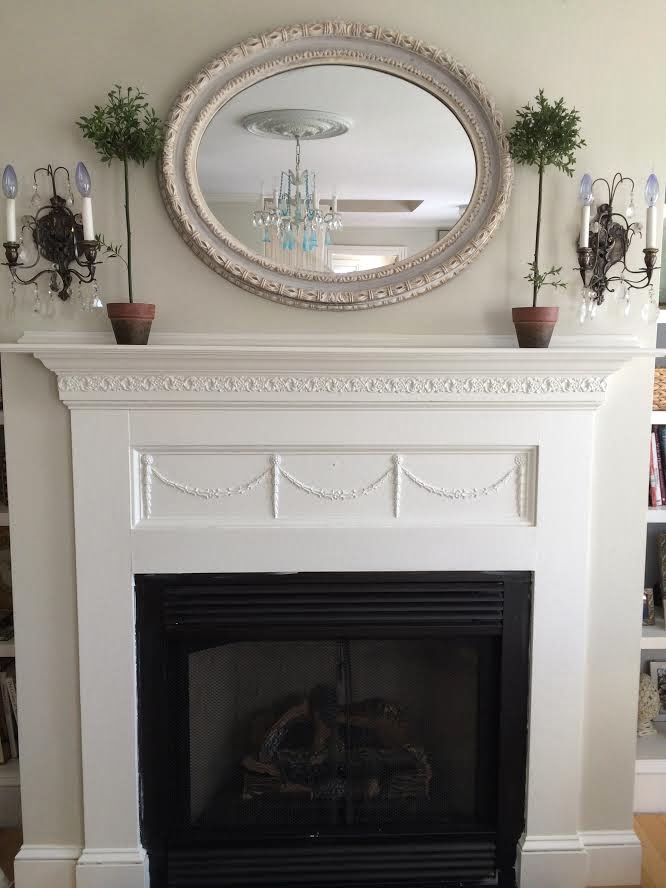
 Today my living room looks like this. 
 It is still a work in progress, as you read along you can see
my latest thoughts on where I want to take this room.
But first, let me show you how it evolved.
   My room three years ago was Shabby Chic in style.
Very feminine and vintage decor. 
Then I got inspired by designer Annette Tatum's floral
backed bookcases and her use of the pastels I favored, 
when I saw her room in a magazine.
 Annette Tatums living room just bowled me over! 
I had to try this with my bookcases!
So I cut up some pretty floral fabric and wrapped it around foam boards
 and started backing the bookcases. This way I could take it out if 
 I grew tired of the look.  Above you can see the first panel I
 added to the bookcases, and I was loving the look.
The funny thing was that Annette changed her living room not too long after. 
This version was in another magazine spread and now
 her pink floral backers were changed out to floral with cream and pink colors. 
 She changed her slipcovers and accessories as well. I loved this version too! 
 So for all of us who are constantly changing things around, this is normal!  
So my bookcases looked like this for awhile, 
and the room was still very Shabby Chic.
About a year later I did a total makeover towards Traditional style
 and took out the floral backers and painted everything grey.
Traditional style living room. However this look
 just wasn't me, and things would get changed up again.
I painted all the woodwork white and added a formal mirror. 
The floral backers came out of hiding in my storage trunk. 
 Books, baskets and framed family photos were added to the bookshelves. 
The baskets picked up the texture in the new sisal rug
 and helped balance out the feminine design.
I actually have a different backing in mind,
 but the floral ones were ready to go so I popped them 
in place and there they will stay til I get a few days 
off to try out the wallpaper I really wanted to use.
Its Laura Ashley's Summer Palace wallpaper. 
 I have two rolls and I want to use this on my bookcases. 
Its fun and modern and still has the colors that I prefer.
I think this will look perfect (for a year anyway)!
But for now, it is the vintage chintz that lines the shelves.
 Decorating bookcases is tricky as they can hold a lot of stuff. 
Of course they can be filled with books for a library look, 
but I like to add bits of flavor with home decor items.  
Picking three basic categories,
I will repeat them for a cohesive look.  In this case it was
 books, baskets and glass/ceramics. 
 I also added a few groupings of framed family photos 
to personalize our room.  
 Some of the items on the shelves, like this large mercury glass vessel 
as well as all the baskets were purchased at HomeGoods. 
 The other items were either gifts or family heirlooms 
with sentimental attachments.

Annette's bookcases had groupings of antique books 
in the same binding colors.  
Finding good looking old books is not easy.  
I am always on the lookout for nice old books that share
 the same color bindings so I can create groupings. 
 I am sure Annette doesn't read these books, they are just there to look pretty.
And pretty they are! she also mixed in a few decorative items.  
The books don't compete with the floral backings and 
the brown color minimized the femininity of the design.
 I would love to have beautiful old golden brown leather antique books in my cases. 
 But this is the real world, and these are books we read. 
 Lots of home design books as well as books on dogs and home repair 
sit on our shelves.  This is my favorite room to enjoy a good book 
with a glass of wine or a cup of coffee.  The light streams in 
from the front windows from sunrise to sunset making
 this my favorite room in the house.
 I love natural light! Its a feel good accessory all by itself. 
This morning I added some tiny white fabric lampshades
to the sconces.  I love how they look.  I got them off of a vintage
fancy crystal chandelier out of a town house in Boston.
More changes are on the way.  I want to get some new chairs  for starters. 
 The other side of the room is still in process and when I figure that side out I will share it here.  Its got a piano, and I have been pushing it in different positions to see what works best.  This room is a relatively small square shape room that opens into the dining room and the front entryway, so its a bit of a challenge. Especially when you have lots of stuff, like we do.  But stuff makes a room have a personality, doesn't it?  
As I downloaded the photos from my Canon camera, 
I saw this "selfie" of Colin.  
I had to smile, although it was with a twinge of nostalgia
 as this was Colin's last day at Maison Decor.
Colin landed a "real" job with a firm in his chosen field 
of Building and Construction management.  He helped me start
 my little business from day one while he was busy getting his degree 
at University of Massachusetts.  He would drive home on weekends 
to help me move furniture or paint walls and clocks 
and really was such a tremendous help.  When he graduated he came on full time 
now joining me and my son Justin and what a team we made. 
 He started work this week and its been 
a major adjustment for me and Justin. We are sad to see him go,
 but happy as this is the right move for him and we know
 he will be a tremendous success! 
 Thank you Colin for being such a supportive son
and awesome employee.  
Wishing you the best that life has to offer~you deserve it!

Photobucket
Note: Some of this post has items sponsored from HomeGoods.  All opinions and ideas are my own.
Read more »

Tuesday, April 1, 2014

My living room


 My Living Room
I just finished a couple of quick projects....
It all started when I decided to carry this line of beautiful latex furniture
moldings or appliques.  They are imported from New Zealand and the line is
called Efex.  Anyway, Maison Decor is selling these now, and I have fallen
hard for how easily you can create a look by attaching appliques.
You can see an oval mirror I used after I finished the mantle.  I realized
I could make one to fit perfectly by adding some appliques.
This is the before shot of the mantle with its clean classic lines
painted in Paris Grey Chalk Paint® by Annie Sloan.
Bam! 
Pretty big difference right?
Look how I did it....
I got to work laying out Efex moldings onto an old HomeGoods mirror
I had hanging in a different part of the house.
It turned out really pretty!
 Not only did I do the mirror and the mantle with Efex moldings,
I went upstairs to my storage trunk and pulled out the blue chintz
floral fabric covered backing boards I used a few years ago to line
the bookcases. 
 Its a pale blue ground with lots of my favorite colors.
 Its a vintage chintz by Mario Buatta.
I found it in an antique shop in New Hampshire
and they were made up as pinch pleat draperies!
I ripped them all apart and taped them around foam boards
with some duct tape on the back after measuring each shelf.
Fast forward two years or so...this fabric 
is great with my antique painted coffee table!
 I guess its really a tea table or an occasional table or maybe a writing desk 
as it sits higher than a coffee table does.  You all know we have 
dogs in the house and to keep our white slipcovers from having 
to be laundered too often I have a simple white quilt laid across the 
seat cushions, so we can wash that in a pinch.  
 The floral hooked rug that used to be here 
is now rolled up and in the attic in favor of a sisal rug.
I love how it looks.  Maybe it balances out all of the florals in the room.
Its less frou frou, even though the room is still very feminine.
 So happy with the quickie makeover!
 Its fresh and pretty and it feels like spring.
I will be sharing more home projects with you soon
and one special Efex project coming up in a couple of weeks
that I am super excited about!!
I really enjoyed my day off from work and pulling it
all together today.  I hope you enjoyed this post from my home
as I often am told people miss my home! That is so sweet to think
that readers were enjoying the things I was doing and wanted to see more
Tomorrow I will be back in the shop however....
We got in a huge order today and will be 
adding new appliques online this week!
Maison Decor is located at 
150 Main Street Reading Mass 
or online at www.shopmaisondecor.com
For more information on Efex click here.

Photobucket
Read more »

Friday, March 28, 2014

Embellishing mirrors with appliques

 I love the look of beautiful mirrors encrusted with layers of moldings.
So this idea of using a nice enough mirror and then building it up
with layers of moldings was hatched.  
Using the latex moldings and appliques,
my intentions to channel the inspiration mirror, below.
I particularly liked the way the moldings were laid over the mirror part.
The contact cement used to apply the Efex latex moldings will attach
the molding to glass and mirror as well as wood or composite.
 Here is the layout of the Efex moldings. I played around with a few
combinations and started laying them out and drew a sketch
so I would remember how to reassemble.  I took a few pics as well.
Now they would all come off and get painted then glued then returned
in order of bottom layer to the top.
 I have used both latex paint and Chalk Paint on these
moldings in the past, and for this project it was the latter.
A coat of Old White and these babies were ready to be glued as soon as they
dried.  I traced the moldings onto the wood frame and the mirror using a lead
pencil, then applied the contact cement on the back side of the molding as well as
onto the glass and the wood frame.
 After waiting 20 minutes I repositioned the moldings onto the mirror and the frame. You can see the yellow glue. After this dries in about a half hour, it can be painted and you will not see the glue.
Regular glue or hot glue will not work on latex moldings. These latex moldings are flexible and are a joy to work with as they can bend over the ridges of the mirror.  To remove any excess glue on the mirror use a bit of mineral spirits on a cloth to dissolve the cement. 
The finished mirror made more beautiful 
with layers of applied Efex moldings.
I think I have the perfect spot for it~
right over this mantle that I did earlier this month using a combination
of Efex latex moldings.  Don't you think it will look amazing?!
Create some magic for your home by adding some Efex.
I can't wait to hang my "new" french mirror!
 I grabbed this charming bowl of roses at  my last visit to HomeGoods.
 It adds a bit of romantic cottage style to the living room.
Look for the mantle-mirror reveal next week!!

Photobucket
Disclaimer: Part of this post is sponsored by HomeGoods Happy by Design Pinterest program.  
All designs and opinions expressed on my blog are my own.
Read more »

Sunday, March 23, 2014

Styling a mantle with lanterns and florals


Its that time of year when spring is approaching and we need a bit
of freshening up in our homes.  One easy place to start that makes a big
impact is the mantle above the living room fireplace.
The mantle can make or break a room! Its usually the focal point of 
any room that has one, and if you are lucky you can get away with just
changing the decor around a mantle to keep you in the style as the seasons change.
This home I am currently styling has a big open floor plan with high ceilings and a 
monochromatic neutral color scheme of mostly white, cream and grey.
Everything is over-scaled so to make an impact I kept it simple.
To soften the stone and the lines of the mantle I added a 
few different types of faux floral stems in white and tucked 
them around some different sized white washed lanterns with silver tops.
I found my florals and the lanterns all at my local HomeGoods.
The before photo of the mantle shows a restrained grouping of white vessels.
Its all a bit too shiny and hard between the polished granite surround and glossy mirror~
so enter the vines and florals to change that.
The simple addition of florals across the mantle softened the entire room. 
 The three lanterns in varying sizes make
 a nice cohesive arrangement with the florals 
woven around them.  A stone owl with a bit of faux lichen
 sits in the center, nestled amongst the vines.
These lanterns have staying power~when fall arrives the florals can be
changed out for an autumn leaf garland with berries.  When 
Christmas arrives, little white lights in a faux green garland 
would be very pretty and classic.
 Fill the lanterns filled with shiny silver ball ornaments
 and your mantle is ready for the holiday season.  
Who doesn't like things to be easy and chic?
The mantle is just part of this room that I am still working on.
 I will be back showing off more spaces in this beautiful home.
Follow along as I  accessorize it with items from
 HomeGoods and Maison Decor.


Photobucket


Note: This post is sponsored by HomeGoods Happy by Design Pinterest program.  
All designs and opinions expressed on my blog are my own.
Read more »

How I Found My Style Sundays

How did I find my style?  What is my decorating style?
 What things do I love best in my home? 
What tips can I give those interested in their own pursuit of home decorating? 
 I was invited to answer these questions for Pamela today 
as a guest blogger at From My Front Porch to Yours:
  How I Found My Style Sundays.

How I Found My Style
   The funny thing is that I find my style is always in a progression of change. 
 Its not a static thing for me, and maybe you can relate to that....
or maybe you do things once and the room stays like that because its "done"? 
My style is in flux~ever changing. Want to hear more?
Head over to Pamela's to read more on how I found my style!
Shabby Chic Cottage Style
Did I keep this look, or change it out?
Find out more....
Photobucket
Read more »

Friday, March 21, 2014

Use Foil for an easy Silver Leaf finish!


 Aged silver leaf on a cabinet is a beautiful look.
Want to get the look without the hassle?
Our lovely cabinet was not so lovely to begin with,
take a look at its transformation.
This wood cabinet is an old stereo cabinet.
The front panels had cracked decorative panels that we removed.
Next step was using Annie Sloan's wonderful paint to cover.
We used Graphite Chalk Paint for the base to our silver leaf effect.
After the paint dried we applied a coat of Artisan Enhancements Leaf and Foil sizing.
Its like a watery glue that you paint on with a brush.
Colin and I painted the sizing on together working from either ends
of the cabinets.  We were undecided about the panels so we did not
apply the sizing inside the paneled area at first. Later we changed our minds
and did size that area as well. Wait for the sizing to dry to tacky status,
about 45 minutes.
Then start with a sheet of foil that will cover an area.
Foil is thin and on a roll (you can see it on the floor next to me).
It comes in silver, champagne and gold.
Where ever you paint the sizing on is where the foil will stick.
I roll off about 18" and then stick it matte side to the sized area.
Then rub it on with a scrub brush or a dried sea sponge to make good contact
before you peel the sheet of foil back.  The metallic foil will stick to the cabinet
and the sheet will come off almost transparent, as you can see above.
This is soooo easy and fast! Foil doesn't flake like silver leaf and you can do
large sections at a time, making this project go very quickly indeed!

Rubbing it on, peeling it off~this is the look.
You will see the brush strokes of the sizing and it creates a 
very natural leafed effect.
After a bit of debate, Colin went ahead and foiled the interiors of the panels.
Then he selected a stencil and used Graphite Chalk Paint to go over the silver.
Look at how amazing this looks!
Our stencil pattern was Royal Design Studios Small Eastern Lattice.

You can see how it looks after Colin finished the first door,
After it was all finished he protected it with Artisan Enhancements Clear Top Coat.
We use this over special finishes, like foil for a clear protective coat.
You can finish it with Annie Sloan's clear soft wax but it will dull down the foil.
Finished silver leaf effect cabinet!
Finished in one day! Hooray!
To see how easy it is to apply foil,
watch the quick short video below.

Photobucket
Read more »