

Annie Sloan
Creator of Chalk Paint decorative paint
Here are my Chalk Paint Tips.

Remember the Chalk Paint basics:
no priming, stripping or sanding
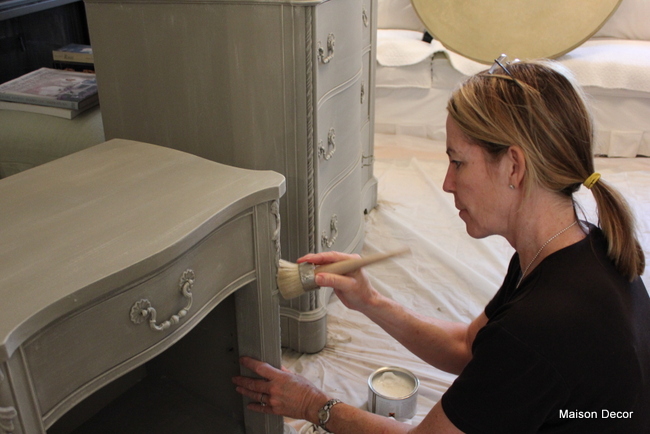
Assess your piece.
Usually you can just start painting. But read below carefully before you start.
Is it super shiny? If so I do go over my piece with a sanding block to knock back the shine. If I think it has been polished with furniture polish over the years, I will wipe it down with mineral spirits on a paper towel to dissolve any polish. Otherwise just start painting! Chalk Paint dries quickly so don't use repetitive brush strokes or you will get a rough finish. Long fluid stokes are best.
Load your brush up with the paint and use longer strokes across the piece,
trying not to go back and forth over your strokes as you can with latex and oil paints.
Adjust your style of painting: Longer fluid strokes.

Kind of shiny....and will need some clear shellac too.
No Prep!
You really don't need to prime or prep, unless its shiny. Also, if the piece has chips or gouges those are issues that need to be addressed as the paint does not make those problems disappear. If you have a piece of furniture that starts to bleed while you are painting (which means a discoloration comes through your lovely paint job), stop painting! Get a can of Zinsser Clear Shellac and go over the entire piece. It will dry quickly and then you can resume your paint job.

Tip #3
Use water on your brush for the second coat.
One light coat of paint, followed by a second light coat should be your protocol for most pieces of furniture. When you start your first coat, expect to see brush strokes and some of the wood peeking through. You might feel like your paint job is looking amateurish~but wait til the second coat goes on. You will look like a hero! Two light coats of paint is the rule, not a heavy gloppy first coat to try to cover the surface. When you apply the second coat I like to "kiss" the tips of the brush in a bit of water to help the second coat glide on smoothly. It makes a huge difference. As you are painting check the edges to make sure it is not running or globbing on the side you are not directly painting. I am checking constantly to make sure there is no buildup as I paint.

Tip #4
To Distress or Not?
After the two coats are finished, this it the time to decide to distress or not~if you are going to distress your furniture I like to do it before I wax. Its a personal preference. Go over the edges where it would be worn authentically with the passage of time. Resist the spotted look~a little bit here and a little bit there creates the dreaded Leopard look!
Wax for a finish
Now your piece is painted (and distressed or not) and ready for waxing.
Apply wax in sections of about a square foot at at time and wipe off excess wax with a soft cloth.
T shirts work great for this. Repeat until finished.

Apply a small amount of wax by brushing the tips of the wax brush onto the wax and then apply to the surface of the furniture. You can also apply wax with a soft clean t shirt or rag.

Buff your piece
After waxing wait a few hours (or overnight) and then buff your piece to get a luster.
Buffing is underrated~it gives a terrific finish to your piece. You can buff with a buffing brush or a cloth.
Buff means to rub the cloth or brush briskly over the surface and you will see a sheen develop. It takes a piece 21-28 days for wax to fully cure, so until then use extra care with your piece.
Caring for your wax brush
If I am doing a lot of painting and waxing I store my wax brush in a neoprene (not latex) surgical glove. It keeps it nice and supple, ready to be used, even several days later. I don't like to wash my wax brush until I am finished with it for a period of time. Wash your brush with warm water and Dawn dishwashing liquid. It cuts through the wax nicely. Then I paper towel it off and shape the bristles together as I towel it off, then place flat to dry.

Tip #7
Dark wax? If you plan to age your piece with dark wax, you want to apply it right after you apply the Clear wax. Don't let the clear wax dry first~if you do, then lightly wax again with clear wax, then apply small amounts of dark wax in areas that would look good with a patina. Apply dark wax with a separate wax brush, like the one shown above or a cloth. After you apply a small amount of dark wax, use a clean cloth and rub it around on the piece~continue until the piece is done. Do not use your clear wax brush for dark wax as it will cause staining and render it ineffective for creating a clear wax finish in the future.

Clear wax is a dark wax magic eraser!
Too much dark wax? No worries.
If you think your piece got too dark with your application, add some clear wax with a cloth and rub to remove the dark wax area you would like to lighten up.

Mix clear and dark wax together
A combination of a little dark wax mixed with the clear wax on a paper plate and then applied can be an easier way to use dark wax. Try this to see if you prefer this method. Remember to always apply any dark wax over a fresh moist coat of clear wax.

Dark wax changes the color of Chalk Paint.
The desk in the photo above shows Paris Grey. The greenish khaki area is Paris Grey after treated with dark wax...it looks totally different. I recommend making a sample board with your paint color, wax the entire thing, then use dark wax over half the section so you can access the effect of the dark wax.

Do not use wax on outdoor items.
Chalk Paint can be applied to front doors, home exteriors, bird houses, metal and cement garden statuary and more. The reason we don't wax is that the warmth of the sunlight keeps the wax from curing. Yes, you can paint a front door and wash it later on without a coating of wax!

Caring for your piece.
Do not use furniture polish on your waxed pieces. A damp clean cloth will do the trick. Smudges can be removed by applying a bit of clear wax and buffing out the spots. Over time surfaces can benefit from another a coat of wax, particularly on pieces that are getting rubbed down a lot over time, like coffee tables, kitchen cabinets and the like.

My kitchen in Old White with Clear Wax
Click on the comment section below to see readers questions and the answers
I gave in regards to their various paint and wax dilemmas.
QUESTIONS?
Scroll through the comments as you might find an answer to a question you have been wondering about.


Great tips Amy! Thank you for doing this post.
ReplyDeleteAmy,
ReplyDeleteGreat tips! I have been cleaning my wax brush with mineral spirits.But I don't have too? I can use dawn liquid detergent?What about paint brushes the same too?
xx
Anne
Oh one more thing I use old t-shirts to buff.Is that a good thing to use or would you recommend something else.I use 100% white cotton ones.
ReplyDeletexx
Anne
Awesome! So many of the questions I had about my first piece answered! I had a hard time applying the dark wax and I love the mixing idea! Clearly I need to get a wax brush!!
ReplyDeleteOnce again thank you!
Anne, yes you can use clean white tees for your buffing and wiping needs. I use the Dawn for washing my brushes too.
ReplyDeleteI read all your tips, even though when I don't know what to do next, ALL I DO IS CALL YOU!!!
ReplyDeleteTalking is gooder than reading!
Good post though......I may have actually learned a leetle bit.
Amy:
ReplyDeleteA question. If I have a piece (a trunk I use as a coffee table) that hasn't been waxed, should I avoid putting damp/wet things on it - like drinking glasses?
And if so, after I *do* wax it, would that alleviate the worry?
Thanks so much for the tips!
Pamela
Yes Pamela, wax it then you can put a drink on it~but not for 21-28 days! And if you do get a ring from a drink the nice thing is that it will evaporate. That will never happen with latex! If you don't wax it you can't rub dirt off it or clean it easily. The wax seals the piece. If it were a mirror or picture frame hanging on the wall you could leave unwaxed cuz it doesn't get handled...does this help?
ReplyDeleteAbsolutely, and it's what I had assumed.
ReplyDeleteNote to self: budget for wax/brush before annual Christmas open house ;)
Thanks!
Pamela
So happy you did this post, it has and will help me with questions that I know I will have!
ReplyDeleteRondell
Amy- Great tutorial. I really appreciate you taking the time (I KNOW what a busy woman you are!) to show us the correct steps to follow. Blessings Paula Lusk
ReplyDeleteThis post couldn't have come at a better time for me. I just bought and used my first can of chalk paint today! Yippee! I painted my dining room table (it wasn't a high quality wood anyway). So far, I've put on 2 coats of paint. I'm letting it dry and then I'll wax it. I still haven't decided if I want to distress it first though. Hmmmm...... decisions, decisions. Thanks for all your tips. I read through them carefully. I hope I don't screw this up! Ha!
ReplyDeleteSo did you end up distressing the piece?
DeleteWhat a great post! You are so inspiring--the fact that you love chalk paint so much is infectious! You answered a lot of questions in this post. I bet your workshops are so fun!
ReplyDeleteExcellent post, Amy! Great advice. I thought I knew most everything about chalk paint, but I didn't know that you had to apply the dark wax right after the clear wax. I would let the clear wax dry. I found I didn't have great control of the dark wax, so maybe that was my problem.
ReplyDeleteAnd yes, you can put anything on a waxed piece! I did my kitchen table (and posted about it) and was appalled the first time I put a hot cup of coffee on it and saw the circle, but no worry, it disappeared shortly after. I'm not too worried now as nothing seems to hurt the finish.
(And even if it did, I can fix it myself!)
I have been quietly watching your blog and several others for a long time and decided to try one of my own. I am always impressed by all yu do and know and was thrilled when you opened your stores. I am your newest follower. Juliana
ReplyDeleteThank you for this most informative post, Amy! Lots of great information here for those us that don't have a lot of experience with chalk paint. Or any experience -- I have a bunch of samples of it at home but haven't used them on anything yet! Time to bust out the bottles and brushes!
ReplyDeletethanks for post! answered lots of my questions!! on cabinets...applying the wax..any special way..or just small areas?or apply to entire front of cabinet then buff?
ReplyDeleteOh man this is a great post! I too have a chance to start using ASCP and wax. I'm going to use it on a grand piano. Hubby is a Registered Piano Technician who'll be rebuilding all the "playing parts". I get the outside ;-)
ReplyDeleteSoooo...I'm quite sure there won't be any distressing but what do I do for the parts of the cabinet that are damaged from sun exposure? Do I sand them lightly first? The cabinet is not a high gloss finish.
And no, readers,the customer does not want to have to pay upwards of $5000+ for refinishing a piano.This might be a viable option for her.
Thank you so much for the great tips! I wish I would have known all this before I did my first piece. Live and learn. I am going to print out your tips for future use. Thank you, Amy. :)
ReplyDeleteAmy, thanks so much for posting this! I still haven't used the chalk paint yet but am about to use the wax on a piece and loved getting to read all of your tips. And I LOVED reading all the details. Am about to pin this post so I can refer back to it when I do finally make my first chalk paint purchase! =)
ReplyDeleteHi Amy,
ReplyDeleteThanks for your insightful tips they will benefit me on future projects. Quick question: I painted a hutch with ASCP a few months ago & while it turned out great it still has that "old" smell some old pieces of furniture get some times. (YUCK!!!) I thought the ASCP would nix the odor, but it hasn't. Any suggestions on what I could do to rid the piece of the old/smokey odor?
Hi Shara, That is a shame. Most paints will not block odors like smoke damage or mildew. They all need to be sealed before painted. The Zinsser Clear Shellac is used for this too. I will add this to my tip list and answer this in the post as well. What you have to do is to now rub down your piece with a cloth using Mineral Spirits to remove the wax. Paint the entire piece with the Zinsser shellac. Then repaint one coat of the Chalk Paint and rewax. It is the only way to get rid of the smoky smell.
ReplyDeleteAnonymous, When doing kitchen cabs with wax its the same as any piece of furniture. I do one cabinet at a time. Apply wax, rub down with cloth. The next day I buff it lightly and then apply a second coat of wax for extra protection. YOu do the second coat the same way, apply, wipe wait 24 hours and then buff.
ReplyDeleteConnie if your piece has damage from the sun (or any damage) it needs to be taken care of before it is painted. If there is cracking, you will see the cracks, etc...so perhaps you can use a wood filler like Elmers (as in the glue company) to smooth out the damage and then you can go ahead and paint after lightly sanding the area. If you sand the areas, sometimes that will encourage bleeding, so you need to look out for that and if it does, apply the Zinsser.
ReplyDeleteAmy, thank you so much for this info! I purchased some ASCP a couple of months ago and am ashamed to admit I have been too intimidated to attempt using it. Now I feel better prepared to try. One silly question, do you apply the "kisses" of water to your paint brush before or after you have it loaded with paint for each stroke of your second coat? Thanks, again, for all these wonderful instructions. Just wish I lived closed to Boston so I could visit your incredible store!
ReplyDeleteDiane
Dear Anon, I kiss the tips of the brush before I dip into my paint. I might do this every second of third stroke. You will be able to tell when you need to help the brush glide across the surface and that is when you will kiss the tips!
ReplyDeleteThank you Amy for your help about the piano. Not sure the wood filler will be needed though, with exception of some odd areas. The resultant look is more "alligatoring" so to speak. So hopefully just a light sanding will work. And I suspect I'd have to shallac too. Now the thing is, getting the customer to agree to all this ;-) It might end up being a latex paint job after all. We'll see.....
ReplyDeleteBut thank you so much for your help! I too would love to see your stores in person.
I'm glad that there is a paint like this. This is so advisable for our DIY projects for our furniture.
ReplyDeleteThanks Amy, that was so timely for me. Even as i was reading this post, my sister called and is getting ready to use some Annie Sloan paint on a vintage vanity she bought... so i was able to give her some tips!
ReplyDeleteCindy
Great tips Amy thank you for sharing this. Tracy
ReplyDeleteWonderful tips!
ReplyDeleteGreat timing on the tips! I just bought 5 sample jars of ASCP and there are no instructions on the jar. Should I stir it...shake it...or do nothing before I use it?
ReplyDeleteThanks,
Mary2alight@aol.com
Mary, like all paints, you need to mix them up. Shake the sample jars before you use them. Its easy and effective way to mix the small sample sizes of paint. I also shake my quart cans until I have opened them. After that its best to stir so you don't end up wearing paint from shaking a can with a loose lid. You can turn the jars and the cans upside down for an hour or so before you paint to get the good stuff at the bottom of the can flowing.
ReplyDeleteAmy, I painted a set of four wooden chairs. What do I do about the seat? Should I wax it so that it doesn't get ruined?
ReplyDeleteThanks.
Anon, if you paint wooden chairs they need to be waxed, seats included. The overall cure time for wax is 21-28 days, so take care using them during the cure time. AFter that you will have a durable finish on the seat. I would recommend two coats on the seat and the top of the chair where one might grab it to pull it out from the table. Places that get more wear would benefit from two coats of wax, and these would be applied 24 hours apart with light buffing in between coats.
ReplyDeleteThank you Amy!!! Love your site. Wish I lived near one of your stores!!!!
ReplyDeleteThank goodness we all have YOU to turn to with our chalk paint dilemmas, Amy. You are the chalk paint Queen, girl! Thanks for sharing all of these great tips today. I learned even more from you! :) Like everyone else, I sure wish I lived closer to you and your stores!
ReplyDeletexoxo laurie
Great post. I use this paint a lot on my projects and love it. I addition to what you are saying, I tend to sand the furnuture lightly before putting on the wax. It makes the surface lovely and smooth to touch and it's easier to make it shine when you start buffing it up.
ReplyDeleteI just found your blog! Great post. I used the dark wax on my desk that I use everyday and it is waring off and looks terrible. Should I use Mineral Spirits to remove all the wax and start over? Thanks Becky
ReplyDeleteBecky, I would try using some clear wax first and and see if by adding a small amount of the clear will activate the dark wax and help you manipulate it to give a more even look. I assume you added the dark wax over a coat of clear wax first? If not, I would remove the dark wax with mineral spirits and start with a coat of clear wax followed by the dark wax. Try mixing some dark wax with the clear wax and apply it~some find that easier to control.
ReplyDeleteI've seen the term "dry brush" mentioned in some of descriptions of furniture you've worked on in the store. What is "dry brushing"?
ReplyDeleteThanks so very much for your help! I've taken an ASCP class in my area (the other side of the country from you), but I learn so much more on your site......Especially for trouble shooting! Thank you! Thank you!
Amy, was wondering what color were used on the piece above that is blue, gray and white?
ReplyDeleteKAW, dry brushing is a technique I use to finish off some pieces and one I teach in my furniture finishing class~but basically it is using a very dry brush to apply a second color to create depth.
ReplyDeleteGloria, the color on the ornate piece started off a Louis Blue/Old White mix and then got a covering of Paris Grey.
Thanks so much! After applying the painr w/a "dry brush", do you rub it w/a cloth? Or is the effect that which is produced by the dry brush? Thanks again! :))
ReplyDeleteKAW after I finish a piece with paint, whatever the style or technique, I finish with a clear coat of soft wax by Annie Sloan. Then I buff it out. Makes a tremendous difference. If you decide to do any gilding wax or paste, you do it AFTER the finish coat of wax.
ReplyDeleteAlthough I have used ASCP for some time I have learned quite a bit from your pointers so thank you. I also like to give a quick sand before waxing as I love the silky finish it gives. I have had some issues with my kitchen table top that gets a lot of wear even though I have given it 2 coats of wax. For some reason black streaks appear in the brush strokes and although they dissapear with neat washing up liquid I can't make out why they appear in the first place, any ideas? Once again many thanks.
ReplyDeleteI just finished a book case with Emperor's Silk red and then two coats of clear wax. How long do I wait before I actually use it for a book case?
ReplyDeleteOccasional Pat, the dark lines are basically dirt grabbing onto the strokes marks. They disappear with a water cleanup because they are water soluable marks, essentially dirt. If they don't remove with water cleanup they can be removed with an application of a bit of wax and a rag. They will simply buff right out!
ReplyDeleteHelen you should wait for it to harden. It takes 2-3 weeks to cure to nice and hard, but if you carefully place your items in and don't shove them around they can sit on it while it cures.
I am planning to use chalk paint on an older dresser that I have. The problem is that it has been painted with latex paint over the wood. Can I use the chalk paint directly on the latex paint or should I strip it / sand it first? Thank you.
ReplyDeleteCarie, you paint over any painted surface with Chalk Paint®. If it is very shiny you might lightly sand it, but other than that, just go ahead and paint!
ReplyDeleteThank you for the tutorial and tips for using ASCP on your kitchen cabinets. Yours are the best I've found so far. I'm about to take the plunge and paint my kitchen cabinets, but I'm still nervous about the longterm durability. Can you tell me how yours are holding up? Thanks!
ReplyDeleteHi Amy,
ReplyDeleteGreat post! Your style of teaching is perfect!
I'm working up to trying ASCP but what has been keeping me back is I have a problem with buffing the wax. My shoulder would not like the movement and I would end up with a great deal of pain. A smaller piece (i.e. small demi-lune table) would probably be OK but a larger piece - no way. Can poly be used over the paint? or is there anything else you can recommend that doesn't require buffing of any kind?
Thanks for any help you can give me.
Cathy
We just bought a gorgeous piece off of Craigslist for our nursery. The seller made her own "chalk paint" and waxed it with clear wax. We are planning on repainting it to Old White since the color is currently turquoise. Do I need to do anything to prepare to paint over other chalk paint/wax? Will the turquoise bleed through the white? Our girls' room is lavender, greige and white, I really don't want bits of blue poking through. We don't plan on distressing the piece at all.
ReplyDeleteNiki, The Old White will cover your blue piece just fine with no color showing through. Its got superlative coverage and blocks out the darkest of colors. If you aren't distressing the blue will never be seen. Finish off with Annie's clear wax for a nice durable finish with a soft luster.
ReplyDeleteHow long b4 u can use ur dining table after painting, waxing and buffing??
ReplyDeleteKimberly you can use it if you are very careful for the first few weeks with placements or something underneath anything hard or abrasive. It takes 2-3 weeks to fully cure and harden. I use my pieces right away but I am just tender with them...still it is painted furniture, and should be treated as such even after curing.
ReplyDeleteAmy...I love all you have done...I have redone a grandfather clock and a kitchen set with milk paint...now I really want to do my kitchen cabinets..I would love to use chalk paint on them...just not sure how to apply....the cabinets are laminated white over some kind of pressed wood...builders grade ugly stark white...I detest any kind of shine...can I use a primer for laminated cabinets and then use chalk paint over it....scared to just start without any advice...Please help...I am really itching to start....It seems like once you start using these paints you never want to stop
ReplyDeleteHi Amy...
ReplyDeleteI'm in the process of painting a dresser. So far I've got the 4 drawer fronts done. I've applied 2 coats of paint, lightly distressed and applied a coat of wax but not buffed. My problem is that I still see alot of unsightly brush strokes *newbie painter*. How should I fix this? Could I buff the piece, then start over with a coat of paint?
Thank you for the wonderful tutorial!
Julie
Thnks for this post. I found it after working on an outdoor project. I painted metal chairs with AS chalk paint and clear waxed then antiqued with dark wax. I saw you said not to do this. I had read in AS materials that I should wax which is why I did. These chairs are on a hot sunny deck. What problems might I have? I wondered if the wax would melt after seing how the wax cleaned up in hot soapy water, melting off the brush
ReplyDeleteSandyb, you will want to remove the wax from your outdoor furniture as you are right in noticing wax cannot harden and cure in the sunlight outside. So it can be an awful mess. The paint will do fine without it~I have found my wooden painted pieces outside will fade over time, but no peeling cracking or flakiing. To remove the wax wipe down with a cloth soaked with some mineral spirits. One other option is to seal the waxed furniture with Clear Top Coat by ARtisan Enhancements. That is a product line carried only by stockists but is NOT part of the Annie Sloan brand. It was made to offer protective coating over or under wax finishes or even just over Chalk Paint® in lieu of wax. It is rated for indoor outdoor use and has UV protection as well. I sell it in my online store at www.shopmaisondecor.com or you can inquire at your local stockist.
ReplyDeleteWill ASCP wax melt in the sun, after it has been fully cured indoors? When the wax cured on my first painted/waxed
ReplyDeletepiece of furniture (after a good 30 days), I was amazed at the hardness and durability of the finish! If Sandyb was to wax and fully cure her metal chairs indoors, could she then use them outdoors?
Thank you! :)
KAW it will not be safe. Even though pieces may have cured, the sun will still soften the wax finish...we put a bench outside that was cured. It had a clear and heavy dark wax finish...oy vey what a mess.
ReplyDeleteThanks so much.....Saves me (and Sandyb) from a potential disaster!;)
ReplyDeleteSo sorry if this comment comes twice. I've never tried to post a comment!! Can I use just the clear wax on a stained and poly finished piece. Should I do any prep work first since the wax will be applied directly over the poly? I'm so unhappy with the poly. After reading all of your fabulous info, it's chalk paint and wax on all future projects! Thank you so much!
ReplyDeleteGabby!! Sorry this is not going to work~you would not apply wax over a poly finish as there is nothing to absorb the wax. It will just sit on top of the poly. Chalk Paint is an absorbent paint and it will take the wax and drink it in much like our hands/skin take in moisturizing hand cream. You can apply to wax over a wood surface that has been stained or left natural, but once it has its plastic protective armour of poly the wax is not going to work. YOu can paint your piece over the poly with Chalk Paint and then wax and have your cake and eat it too.
ReplyDeleteCan this be used on an exterior metal door? I'm in Vegas and find that every paint I've tried on the door bubbles in the heat and full sun. Does the paint fade, or is it durable enough. Can I seal it to make it easier to clean? Thanks!
ReplyDeleteI am going to paint my kitchen cabinets with ASCP. I have had new doors made and a pantry built so it is all new wood. The base ,however, is not. It was painted with latex 15 years ago. Do I need to treat the new wood in some way before painting or just go for it??? I'm really kind of nervous about this!
ReplyDeleteYreal, we paint unfinished wood all the time with wonderful results. So you should just paint over both types without a worry unless your new wood has any knot holes. If it does, then you can seal it with Zinsser clear shellac and then after it dries, go ahead and paint.
ReplyDeleteHi. I have never used chalk paint before but love the effects and want to start. Do you know of any workshops in the Dallas Ft Worth Texas area? Do you ever travel and give workshops? Thanks for your help.
ReplyDeleteI am new to ASCP but I am having so much fun. I have been painting fool. I have several items I've painted with ASCP that I want to take to a local outdoor Antiques Festival to sell. I understand that you should not wax if it is going to be used outdoors. So with that how will it effect my items? It is a two day show and I only have a 10x10 tent so some of them will be in the sun during the 2 day show. Will it hurt the tables?
ReplyDeleteThank you so much for these wonderful tips. I have been using ASCP for two yrs but I still learned a couple of things. Aialso painted my kitchen cabinets, distressed then applied a glaze. Over a year later they still look fab and clean easily, thanks for taking the time to share your knowledge.
ReplyDeleteHugs,
Peggy~PJH Designs
Peggy.....
ReplyDeleteWhat type of glaze did you use on your kitchen cabinets? I've been wanting to paint my kitchen cabinets for over a year......But the thought of all that waxing has sent me straight to the land of procrastination. Please advise as to how you finished your kitchen cabinets.
Thanks sooo very much!
Karen
Karen waxing is not that big a deal. If you have a wax brush you can do it easily. You do not apply tons of wax so read the how to wax post on the sidebar. Do one cabinet at at time and you can finish a few a day if you like or do them all at once. Its not a big deal!!
ReplyDeleteI really enjoyed this blog…thank you. I have a question. I just started using ASCP and am quickly becoming addicted! I am wondering if there is a good way to store the Chalk Paint. I find that my can tops get really caked with paint quickly!
ReplyDeletesuz
Thank you so much for this information! It is extremely helpful and I can't wait to use chalk paint on my next projects.
ReplyDeleteDoes chalk paint work okay on laminate furniture surfaces? Or is there anything special to do? It is shiny, so I would think light sanding, but it's shiny bc of the laminate.
Thank you so much!!
If you paint a dresser or tv stand how long before you can place items back on the piece? 21 days is a long time to walk around a piece you can not use. Also in the picture above with the little purple table, how do you get the look that you used a little black over the purple? Dry brushing black over?
ReplyDeleteI am new to using chalk paint, so really appreciate your tips. I have found a piece of furniture that I will be using as a bathroom vanity with vessel sink. When I purchased my supplies, the young lady that helped me suggested using a product from General Finishes because of the piece being used in the bathroom. Any advice or suggestions on this?
ReplyDeleteThank you,
Nancy
Is there any way to remove the wax to add to the painted surface? After finishing a dresser it needed something. so i decided to add French writing to the drawer faces but could not remove the wax. Ended up having to stencil and praying it stays on.
ReplyDeleteBetty-Ellen,
ReplyDeleteIf it is freshly waxed with in a couple weeks or less, then I remove the wax by wiping down with a cloth with mineral spirits. It will remove the wax and not touch the painted surface. Then you can paint or embellishment and reapply the wax. If the wax on your piece is over a month old, then you can paint over the wax with Chalk Paint and it will adhere. Then follow up with another coat of wax.
Nancy, I use a wax finish on my cabinets in my bathrooms. Did them a couple years ago and they stand up beautifully. Wax is a water resistant finish and splashing water will not harm your finish. I have tried the General Finishes top coat as they sent it for us to try and we did not like the results. The only concern with a wax finish would be standing water...if water will stand on your waxed surface over time it can penetrate.
ReplyDeleteIs there anyway at all to cover the grain of builders grade oak cabinets with these paints??? I absolutely hate the grain and am looking for a soft smooth finish.. also would you use wax or poly for durability???
ReplyDeleteHere's my buffing hack for flat surfaces. Use a hand sander with terry cloth instead of sand paper! Best shine ever!
ReplyDeleteTip #4 says that if you're going to distress, go over the edges.....Go over with sandpaper or dark wax??
ReplyDelete