Its been awhile since I blogged about a piece I painted at the shop~
we have had a vanity in the shop for almost a year, and it has not sold.
So that always gets me to thinking that it must need a paint job.
My inspiration for this particular piece came to me when I saw
one of my first official Annie Sloan samples I made with
Annie in Boston a year ago. It was lovely Antoinette with a dark wax finish.
The gold you see is actually the gold of the molding distressed to reveal itself,
but I could achieve this same result using gilding wax.
The glamour girl vanity! Do you remember this piece?
It really was a beauty and I thought it would sell au natural~but it did not.
The amber glass mirror pieces were the hardest part of the puzzle
when choosing a Chalk Paint color. What would go nicely with
Amber glass and yet work with this feminine powerhouse of a style?
It had to be Antoinette with a deep gold color gilding! And it had
to be dark waxed to bring out all the details and raise the
elegance level of the color from sweet to sophisticated.
After two coats of Antoinette~looking like a pink ghost.
Read to be waxed!
When I wax and plan to dark wax I do it in tandem in sections at a time.
So I get all my supplies at the ready~
my clear and dark waxes and my clear and dark wax brushes
as well as two clean rags.
On a piece like this I will use a soft rag to apply the wax
into the crevices where the brush cannot reach.
Put it on and wipe it off all in one swipe.
Then I move on with the dark wax. I like to put it on
my brush and off load it onto a plate and then apply.
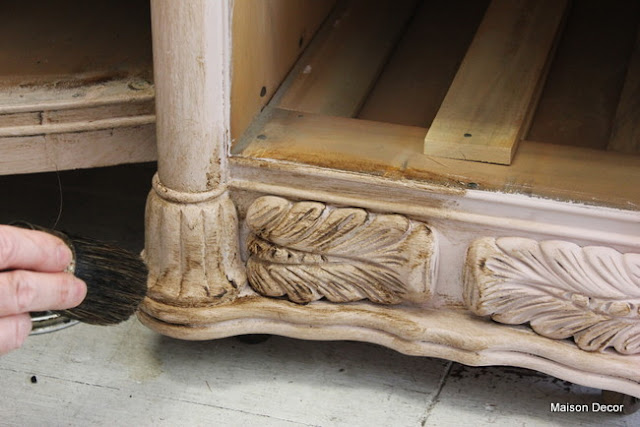
Our hog bristle brush is a bit softer than our ultimate wax brush
and that works really well with the dark wax as it is softer than the clear.
Ideally you want a brush for each color wax~
as you can see if I didn't use a brush to get
this dark wax on, I would have a terrible time getting
it into the recesses of the carved areas.
I move right along quickly...a section at time, making sure
there is a first layer of clear wax before I dark wax.
When you encounter an area where the wax might settle in too
much I like to use a tiny screw driver and insert it into my
wiping rag and use it to rub away the excess dark wax.
Works like a charm.
I do each drawer one at at a time, first clear, then dark wax,
then wipe away. Don't be afraid of how dark it is and scary!
It can wipe right down to give a nice aged look and
it takes your piece from good to GREAT!
At this point the whole piece has been waxed.
It looks pretty good but I have one more step.
Because of the amber glass I decide to use the
only gilding wax I think has the deep rich gold color of
florentine pieces~and its the Renaissance gilding wax
which we sell in our online shop.
I applied it with my finger tip and decided where it should go~
It needed to be on the heavy side because
of the big expanses of amber gold mirror.
This way it will feel balanced.
Almost done....
Looking pretty!
And that's the way to use dark wax to bring a piece to life!
Don't forget the gilding wax if it needs a little
boost in the luxe department!
We are proud to be in the June issue of Romantic Homes magazine!
While I was working on the piece Justin came to the shop fresh off the T (subway).
He and Colin had to pickup an auction load of furniture today~
Working with them is a lot of fun. The mood is
generally light and sometimes pretty goofy.
I wanted to grab a shot of this dresser and told them
to strike a pose....so out comes the muscles!!
Then they both started laughing...its fun like that around here.
I am loving having them both full time now.
The next time I write I will have the whole story on our
new store and all that jazz!!
Have a great day everybody and thanks for reading.


