

This is the "before" photo of the massive Chateau Armoire for sale in the shop.
It is a reproduction piece and had a peachy faux finish coated in a slick poly coat
that just didn't suit my taste. I came up with a makeover plan
for this big boy and it was going to be dramatic!
I planned to use my beloved Chalk Paint® of course,
and some new toys from Artisan Enhancements that we
are excited to have in the shop now.
One of those products is the Transfer Gel and many people have expressed
interest in seeing a step by step account of how it works.

First thing I did was to paint two coats of French Linen Chalk Paint over the armoire.

Because the transfer gel will work better on a lighter base color
I painted the panels of the doors with Duck Egg. My idea
was for the armoire to have an aged Venetian feel to it~
so while it might look pretty simple
right now, it is not going to stay this way! I had two images
that I intended to transfer to the doors,
so I positioned them with a light pencil marking and then applied the
gel to both the cabinet area where the transfer would be
as well as to the face of the image itself.

Paint the gel right onto the good side of the image, not the white side!
Then position it onto the surface and using a plastic scraper
(or a credit card) smooth out all the bubbles. Some of the gel
will squish out the edges, just wipe it away. You can see the
dark areas of the surface that were wet be transfer gel.
These will end up leaving a tell tale sign called a halo.
I will address that later~!

After you attach you images you need to use PATIENCE!
Wait overnight for your images to dry completely and that means
do some other stuff while you are waiting like Justin and I did~
we were playing around with
all the Artisan Enhancements stuff while the day passed into night.

You will see it drying up~even if it looks dry,
it still needs more drying time.
Don't rush this part or you will be a sad artist.

The next day I came in early I was so excited...
I was waiting for Justin
to get to the store so we could start removing the paper
from the images together! While I was waiting I started applying some
other product, Crackle Tex, to the door and I
will talk about that later too.
It was one more phase of the makeover.

Now we started to remove the paper~
we wet rags that resemble face cloths.
You need to be patient with this part too,
be very gentle when removing this paper or you
can scratch it off and have no one to blame but your impatient self!!
I used a sponge and Justin used his cloth and his cloth seemed
to work much nicer than the sponge. I had warned him
so he was very careful, more careful than I was in fact!
I had a few minor scratches and he had zero!
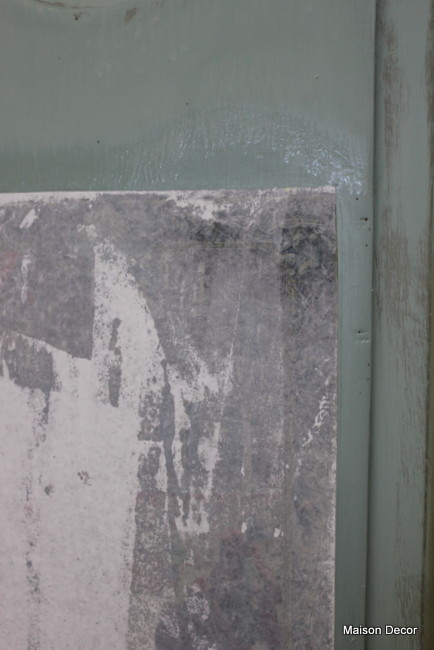
The paper is wet and starting to rub off with the pressure of the cloth/sponge.

See the bottom corner of the image is starting to reveal itself!
You can see the bits of white paper that get rubbed off
onto the floor or the edges of the wet cabinet.

More of the image is revealed with gentle rubbing~

All the pulp is pushed off of the image~do this slowly and carefully.

Its so exciting when it is almost all finished at this stage.

Still so much left to remove though.

More rubbing...
and then when you think it is mostly all gone you
stop and let it dry for an hour or so and look what happens:

All white paper appears again!
So you repeat the process but this time it is more important than
ever to be tender and careful pulling the last layer of pulp away.
Often you can just rub with your fingers when it is wet and it will
roll up under your finger tips. You can use a mist sprayer or a
wet sponge and gently rub. Let it dry again to see if you have
any areas that still have white on them. If you don't take it off it
will mar your transfer~although when wet it looks clear,
when it dries it can be clouded with white paper pulp.
So go through this step 2,3, or 4 times to get it all off.
This is when I did a little damage~you can see a tear halfway
on the right at 3 o'clock.
But I don't care because I want mine to feel old and decrepit!

They are finally finished!
At this point is when you might see a Halo effect.
That is a shiny shadow where the gel touched the wood outside of the image.
You can gently sand it back to remove it or you can dry brush
or paint over it or do what I am going to do~cover it up with a texture.
I am now ready to go onto the next stage~
but if you were going to just do a transfer you could
stop now and either seal with wax or Artisan Enhancements Top Coat sealer.

The next step I took was to conceal the edges of the transfer
so it didn't feel like it was just stuck there in mid panel....
I wanted to give it an embedded look.
So I used the Artisan Enhancements Crackle Tex to create a
crusty cracked film around the image. How to use
Crackle Tex will be coming up on another post.

After the Crackle Tex I painted the remainder
of the cabinet in a soft muddled effect
~dry brushing and washing my head
off with Duck Egg and Chateau Grey.


Just beautiful Amy! I love transferring images to furniture and there are SO many great products out there now! Can't wait to see the finished product!
ReplyDeleteOoooh! The thinks you can think!
ReplyDeleteI may paint my secretary Duck Egg. Not sure. I am waiting for it to tell me what it wants!
I love visiting you, my friend! I always leave with inspiration in my backpack!
xo
Andie
Great piece. Excited to see the end result. What a lot of work those big pieces are. . .but what rewards too. I have a big china cabinet waiting in the garage. Need a few big men to get it into the house for me.
ReplyDelete~ ~Ahrisha~ ~
Question please. Did you paint the piece with the doors on. I find that I have to take them off to paint. Do you have a trick?
ReplyDelete~ ~Ahrisha~ ~
It's looking great already from what we can see, Amy! Love the colors and how you are applying them. I just love that last picture and look forward to seeing the full reveal!
ReplyDeleteWow--there are so many amazing products these days. Thanks for sharing them--I would never be able to keep up!
ReplyDeleteBeautiful Amy! I need to re-read this again I want to try this technique so cool!Thank you so much for sharing!
ReplyDeletexx
Anne
Oh, cool. Can't wait to see more!
ReplyDeleteLooking good, Amy. I like the vibrant images you used.
ReplyDeleteI also just posted about Artisan Enhancements Transfer Gel. If you go read my post, you will see it took some trial and error figuring out that you need to keep rewetting the "white" stuff to dissolve it further. Your tutorial is much more detailed than mine! And the images you picked are very beautiful and renaissance like. Love it!
ReplyDeleteNicole
Hi Amy,
ReplyDeleteWow-such patience and attention to detail. Love everything you do and admire all the passion put into all you create. I struggle with this particular project a bit, I know you are not completely done yet but I still see a creation placed mid panel. It looks too deliberate (even though the deliberate is gorgeous).
I am anxious to try the artisan enhancements gel transfers for much smaller projects and will definitely come to you for my class.
Can't wait to see the finished project.
Another beautiful makeover my friend!
ReplyDeleteThis comment has been removed by a blog administrator.
ReplyDeleteWow! Gorgeous! Can't wait for the reveal. Coming here is like taking an on-line course for free! You are so creative. Thanks for all the inspiration! Best, Beth C.
ReplyDeleteThanks for all the inspiration you share with us.
ReplyDeleteThat is so neat! Looks so pretty... I love how you are always trying new things, and always succeeding! Enjoy!
ReplyDeleteOh my gosh! This is gorgeous! I can't wait to see it all finished. (no pressure...LOL) So impressive! Thanks for always being an inspiration!
ReplyDeleteWhat a long process, but what a payoff! It's beautiful -- can't wait to see the whole thing!
ReplyDeleteAmy what a terrific look so far...can't wait to see your finished piece. You do beautiful work...one talented gal!
ReplyDeleteThis is SO cool Amy! Wow! You are definitely a woman who knows what she is doing! I can't wait to see the final reveal! Jennifer
ReplyDeleteCool! That gives me so many ideas! but patience might just be a teeny weeny bit of a challenge!
ReplyDeleteCindy
Thanks Amy - just getting into it - a number of my customers read your blog and this was really helpful. See you soon. Thanks. generous post. ;)
ReplyDeleteJust beautiful! I love your stools!
ReplyDeleteThank you for sharing!
Furniture Transfer
I am curious if the color white on the print turns into negative space and then becomes the blue.
ReplyDelete