Showing posts with label Artisan Enhancements. Show all posts

Friday, March 14, 2014

Our Inspiration Wall: Chalk Art and Gilded Frames


Our shop in Reading has a lot of painted and embellished
sample boards that we have made over time using different
products.  Many are Chalk Paint sample boards, and then
there are those that we have used more decorative techniques
by adding combinations of pearlescent,
 gilded, crackled and transfer mediums.
I noticed it was hard for shoppers to figure out what they were looking
at, so I came up with the idea of grouping samples together
inside of vintage gilded frames.  I had been purchasing old gilded
frames at auction. Most had ugly artwork or broken bits so I was 
able to get a good deal on them.  Colin cut out backing boards out of 
luann board and painted them with traditional chalkboard black paint.
He mounted the boards inside the frames and they looked stunning!
I could have just put them in the shop and sold them like that,
and maybe I will now that we have our inspiration wall finished,
After the boards were put in the frames I laid out groupings of samples
and Justin got to work creating his magical Chalk Art fonts.
He does it all freehand, and will look at various fonts online for ideas.
You can see how he starts off by spacing the letters with simple stick lettering.
Then he starts getting creative, which is when the magic happens!
He is working in the back room where we hold our workshops.
During the week we usually have various projects in different states
of progression on the table.  You can see the other boards in the back, as well
as a simple sample board I am doing using an 
Efex molding for an upcoming class.
More on that at the end of the post.
AFter he got his lettering all finished, Justin glued down our samples.
This board is meant to show what finishes you will learn when you 
take our popular Chalk Paint® Introductory Workshop.
I love this frame, by the way! Look at the moldings on this baby!
We had a few boards made up showing off the Artisan Enhancement line that we carry.
There are many different decorative things you can do with this line, including
various crackling techniques, image transfers, foiling, stone finish and pearlized finishes.
Now when you come in to get inspiration we hope our boards inspire
in a more obvious way!
How wonderful were those incredible antique frames?
You can easily add embellishing appliques to any frame to get
a similar look to a vintage plaster over wood or carved frame
by using a combination of Efex moldings onto a simple frame.
I am working on different boards using our new Efex latex molding line
we carry in house and online.  This one is a very fine detailed ribbon
applique. You can see a pencil tracing mark around it. When you apply
the applique, you just roughly trace around your piece, then apply the contact cement
to the board and the back of the piece, wait 20 minutes, then stick together and press
down to make good contact.  The tracing line just helps you see where
to put the cement, and where to stick your applique.
Then after about a half hour you can paint right over it.
I am using French Linen Chalk Paint by Annie Sloan.
Push the paint into all the crevices of the molding and then 
brush them out so there is no globbing.
I finished it off with a wash to get this lovely Gustavian look.
You can see all kinds of moldings from the Efex line in our shop
as well as online.  Imagine taking a flat panel door on a cabinet or a closet
and creating an antique French looking vibe! 
Or make fancy frames for your own fabulous chalk board to hang
in your kitchen or dining room!
You can join us at a new Applique and Molding Workshop,
coming up next month! We will be making a wall plaque using the Efex
moldings and decorative paint finishes.  You will see how easy it is to 
plan a project with Efex latex moldings. You will lay it out, cut, glue and paint 
and up with stunning results!
Rounding out the week finds me wearing my designer hat.
Today I will be styling a clients home. 
Did you know I am also a HomeGoods Designer?
 I am part of a hand full of national designers in the HomeGoods 
Happy by Design Pinterest program!
Four carriages and two rolling flat bed carts were filled 
for this exciting home styling project.
I will be sharing the finished results soon.


Photobucket

Read more »

Friday, March 22, 2013

Using Transfer Gel ~ an Armoire Makeover


This is the "before" photo of the massive Chateau Armoire for sale in the shop.
It is a reproduction piece and had a peachy faux finish coated in a slick poly coat 
that just didn't suit my taste.  I came up with a makeover plan
for this big boy and it was going to be dramatic!
I planned to use my beloved Chalk Paint® of course,
and some new toys from Artisan Enhancements that we 
are excited to have in the shop now.
One of those products is the Transfer Gel and many people have expressed
interest in seeing a step by step account of how it works.
First thing I did was to paint two coats of French Linen Chalk Paint over the armoire.
 Because the transfer gel will work better on a lighter base color
 I painted the panels of the doors with Duck Egg.  My idea 
was for the armoire to have an aged Venetian feel to it~
so while it might look pretty simple
right now, it is not going to stay this way!  I had two images 
that I intended to transfer to the doors,
so I positioned them with a light pencil marking and then applied the 
gel to both the cabinet area where the transfer would be 
as well as to the face of the image itself. 
 Paint the gel right onto the good side of the image, not the white side!
Then position it onto the surface and using a plastic scraper 
(or a credit card) smooth out all the bubbles.  Some of the gel 
will squish out the edges, just wipe it away. You can see the 
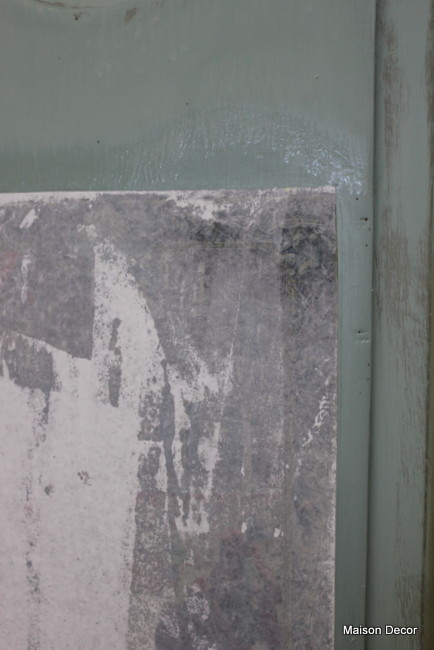
dark areas of the surface that were wet be transfer gel. 
These will end up leaving a tell tale sign called a halo.  
I will address that later~!
 After you attach you images you need to use PATIENCE! 
Wait overnight for your images to dry completely and that means 
do some other stuff while you are waiting like Justin and I did~
we were playing around with 
all the Artisan Enhancements stuff while the day passed into night.
You will see it drying up~even if it looks dry, 
it still needs more drying time.
 Don't rush this part or you will be a sad artist.
The next day I came in early I was so excited...
  I was waiting for Justin 
to get to the store so we could start removing the paper 
from the images together! While I was waiting I started applying some 
other product, Crackle Tex, to the door and I
 will talk about that later too.
It was one more phase of the makeover.
Now we started to remove the paper~
we wet rags that resemble face cloths.
You need to be patient with this part too, 
be very gentle when removing this paper or you 
can scratch it off and have no one to blame but your impatient self!! 
 I used a sponge and Justin used his cloth and his cloth seemed 
to work much nicer than the sponge.  I had warned him 
so he was very careful, more careful than I was in fact!  
I had a few minor scratches and he had zero!
 The paper is wet and starting to rub off with the pressure of the cloth/sponge.
 See the bottom corner of the image is starting to reveal itself!
 You can see the bits of white paper that get rubbed off 
onto the floor or the edges of the wet cabinet. 
 More of the image is revealed with gentle rubbing~
All the pulp is pushed off of the image~do this slowly and carefully.
 Its so exciting when it is almost all finished at this stage.
 Still so much left to remove though.  
More rubbing...
and then when you think it is mostly all gone you 
stop and let it dry for an hour or so and look what happens:
All white paper appears again! 
So you repeat the process but this time  it is more important than 
ever to be tender and careful pulling the last layer of pulp away.  
Often you can just rub with your fingers when it is wet and it will 
roll up under your finger tips.  You can use a mist sprayer or a
 wet sponge and gently rub.  Let it dry again to see if you have 
any areas that still have white on them.  If you don't take it off it 
will mar your transfer~although when wet it looks clear, 
when it dries it can be clouded with white paper pulp. 
So go through this step 2,3, or 4 times to get it all off. 
 This is when I did a little damage~you can see a tear halfway 
on the right at 3 o'clock.  
But I don't care because I want mine to feel old and decrepit! 
 They are finally finished! 
At this point is when you might see a Halo effect. 
 That is a shiny shadow where the gel touched the wood outside of the image.
You can gently sand it back to remove it or you can dry brush
 or paint over it or do what I am going to do~cover it up with a texture.
I am now ready to go onto the next stage~
but if you were going to just do a transfer you could 
stop now and either seal with wax or Artisan Enhancements Top Coat sealer.
 The next step I took was to conceal the edges of the transfer
 so it didn't feel like it was just stuck there in mid panel....
I wanted to give it an embedded look. 
 So I used the Artisan Enhancements Crackle Tex to create a 
crusty cracked film around the image. How to use 
Crackle Tex will be coming up on another post.
 After the Crackle Tex I painted the remainder 
of the cabinet in a soft muddled effect
~dry brushing and washing my head 
off with Duck Egg and Chateau Grey.

 Then I broke out the Gilders Paste creating more of a Venetian feel. 
Purchase Transfer Gel here 


Photobucket
Read more »

Tuesday, March 12, 2013

A random sampling

 Well mostly my life revolves around the shop these days~
painting furniture, ordering inventory, ringing sales, talking to people
about Chalk Paint®, and trying to just keep up.
 The latest offerings in furniture are this Empire dresser~
 A Hepplewhite chest on chest dresser~
 This Gothic dresser~
 The other thing I have been doing every Sunday is teaching my sell out workshops for Annie Sloan enthusiasts.  Its a four hour class and I teach 11 women~it takes a lot of prep work and I am happy to have Colin setting me up for the class. He goes to get the lumber for the samples and does all the wood cutting and the layout of the supplies for the class on Saturday after we close in the afternoon. Much like setting a table~he gets it done!  I just have to make the dinner!! 
 After class I ring up the sales~most people wait to
 take a class to decide what they want to buy and which colors they plan to use. 
 The week before I told you all I was in Colorado at my fellow Stockist pal Robyn Story's vacation home. 
What a blast I had sneaking away from my shop duties!! Here is a few snippets of what went down~
 Robyn sent all the supplies ahead~holy moly! We planned to do our work in the kitchen and laid everything out for an impressive looking photo!! Who wouldn't want to jump right in and start creating? We had no rules~we would be led by our creative intuitions.  Robyn and I were joined by another stockist Stepahnie Kahrs Granit.  It was a 5 day submersion into the creative part of our minds...no stores to watch, only paint and play time. 
Robyn's kitchen got some protective coverings before we began~good thing too as
the paint and product was flying!
We went from the kitchen table over to the island and back again~
most days beginning right after coffee and a bagel until 11 pm!
It was so interesting to see what the others were working on~sometimes one of us
would say "thats not looking so hot" and it would end up being one of our favorite samples!
So that in and of itself was a learning moment...
just keep on working a piece until you LOVE it!
 
 The kitchen table looked like this at the end of every night.
Totally busted up with rags and dirty brushes and pots and bowls of all kinds of stuff.
We had little pots of gilder paste opened besides 
bowls of clear and dark wax~you name it, we had it opened!
We were creating masterpieces!!!
 Step one and step two and step three~we kept photo journaling it 
to try to remember the genius of our ways!
Of course we managed one night out on the Colorado town~
 When we were finished we had some real beauties~this one was Stephanies~
We used Artisan Enhancements Transfer Gel and Crackle Tex along with Gilder Paste on top of Chalk Paint® to create these pretty boards with Robyn's exclusive fine arts images that she owns the rights to.
I will be tailoring a course soon at Maison Decor based on our Colorado Creative trip and it will based upon many of the techniques and results we got while in Colorado. Stay tuned!
We made some beautiful browns with Chalk Paint®  and then gilded the lily on some with Gilder Paste (bottom) and even some Pearl Plaster (top left).
The next thing on the docket coming up soon will be the Annie Sloan convention for Stockist in New Orleans! Justin and I will be headed there for the first week of April. Stores might be closed for a few days, but this trip is a highly anticipated event and I cannot wait to see Annie again and introduce her to Justin.
I will get to see all of my friends that I have made through this past year~its going to be fantastic. We take seminars on subjects and attend talks by Annie, and they always have surprises in store for us too.
For more information and how to purchase Artisan Enhancements
visit our online store here. I will be creating some pieces of furniture in 
the shop before I go away. They will have the Colorado Creative collaborative 
methods we used and I look forward to seeing what you guys think!


Photobucket
Read more »