
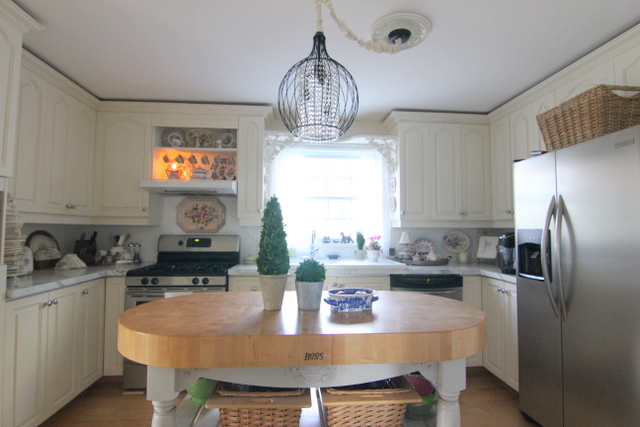
ABOVE~ The kitchen looks like this now!
After doing parts of it over several months
this is a summary post showing all the steps we took.

BEFORE~The kitchen with maple cabinets and faux granite laminate countertops.

Step One: Paint all the cabinets in Annie Sloane Old White chalk paint.

Step Two: Build a shelf over the window by cutting plywood
and covering it with faux tin tile panels, and attach it with vintage iron brackets.

Paint the tile covered shelf with the same paint as the cabinets.

Step Three: Order new countertops in a marble lookalike product made by formica.
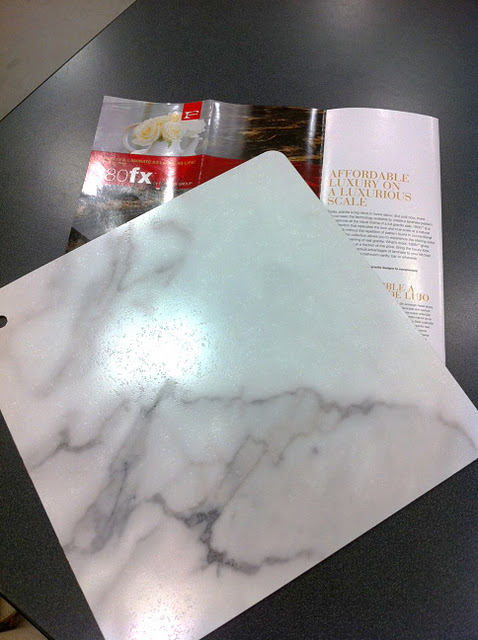
This is a newer product that is a large scale laminate called 180fx by Formica. Large scale means the pattern repeats at 8 feet instead of the usual 12-18". We ordered our counter tops from Lowes Home Improvement stores and it arrived in one week.

Step Four: Install the counter tops. We did this ourselves by unscrewing and removing the old counters.

Step 5: Select a vintage sink. We wanted a farmhouse look on a budget. Anytime you change your counter tops that is the time to decide if you want to change your sink.

We found this sink on Craigslist. It is a 1940s era porcelain drainboard sink. The cost was $75.

This sink fit into the existing base cabinet and the new counter tops were carefully cut to accommodate with a jigsaw. We added a silicone adhesive under the sink to secure it to the counter top.

Step 6: Bead board and Mini Hutch. We used beadboard wallpaper for the backsplash. This paper is by Martha Stewart at Home Depot.We removed the doors and outfitted the useless cabinet above the stove with hooks and a plate rail for displaying a collection of purple transfer ware to add charm to the kitchen.

The paper is three dimensional and looks like the real thing.
It is also meant to be painted so you can choose any color for the beadboard.

The mini-hutch display is finished off with a piece of carved foam molding..

Step 7: Reconfigured the cabinets around the refrigerator to gain more space in the corner. Since we were replacing the counter tops, this was the time to do this job and it was not difficult. We unscrewed the cabinets from the wall and left the crown molding intact and then moved them over and screwed them back into the wall.

This shows the reconfigured layout of the cabinets that used to flank the refrigerator.

The finished hutch that we made out of the seldom used cabinet above the stove.

The old fashioned sink and the marble look counter tops.

Some counter top styling with vintage dishes and silverplate.

Last thing we did was change out the light fixture~


My Vintage Inspired Cottage Kitchen!


It looks just fabulous in there - congratulations, you've done a beautiful job!
ReplyDeleteWhat a beautiful makeover, very well done. ~Grace
ReplyDeleteThis is such a great transformation! I can't wait til you move to your "forever" house and pull out all the stops! HOWEVER! You said you were going to change the light over the island! I'm still waiting for that. What a tease!!! This winter I'm redoing my laundry room in Fl, and this has gotten my juices flowing, so now I'm all juicy, and it's all 'cuz of YOU!
ReplyDeleteI absolutely love your new kitchen. I think one of the best tricks you did was to paint the edge of the Formica to make it blend on the edge. I also love the bead board it make it look so much more "cottage" than anything else.
ReplyDeleteYes, the new island light fixture is on its way as we speak! I cannot wait to install it and will be posting as soon as it goes up!
ReplyDeleteYou've done a fabulous job without breaking the bank. Creative vision goes a long way! Lucky girl.
ReplyDeleteAmazing transformation! Love all your pretty dishes. Everything is just lovely!
ReplyDeleteAmy......I have said it before and will say it again, you are the master of do it yourself beauty, and your vision knows no limits. You wake up with an idea and voila! by the end of the day chances are your vision has been realized.....love it. One of my best friends is just like you and its so much fun because you just never know whats cooking over there!! Love your kitchen transformation, so inviting and charming and pretty!
ReplyDeleteI love beadboard! I've never heard of the paper! Very interesting! I'll look for it! ♥
ReplyDeleteAbsolutely Gorgeous! I love all the little details you've incorporated. From the tin added to the shelf to removing the doors and creating the hutch above your stove!
ReplyDeleteThis is just fabulous, I love everything.
ReplyDeleteA very nice job:)
Rita
I'll bet you smile every time you walk into your kitchen. I know I do when I see pictures of it!
ReplyDeleteBeautiful! I'm so jealous of the amazing transformation. I have a faux finish kit sitting in my kitchen right now. I just need to find the time to devote to the process. Having a kitchen tore up isn't exactly on my wish list for the holidays.
ReplyDeleteYour kitchen looks so much brighter and cheerier! What a fantastic job you did! I love the purple transferware. Great job!
ReplyDeleteSo pretty! This was worth all the hard work you put in! Those faux marble counters are near the top of my to-do list! LOVE! I think I need to hang the chandy I got from you first, though!!!
ReplyDeleteMerry Christmas!
Gorgeous kitchen! I love all that you did...especially that sink! What a cool find :) The amazing part...you did it yourselves! It looks so gorgeous!
ReplyDeleteyour kitchen looks wonderful, what a transformation! I'd love to know where you got your new light fixture!
ReplyDeleteBeautiful job! I've been considering painting my cabinets with chalk paint - how's it holding up? That's my main concern with it...
ReplyDeleteLove the new look of your kitchen :)
Such a beautiful kitchen...And If I didnt read the post I would have thought this is marble counter top :)))
ReplyDeleteamazing just amazing
Rasha@mychampagnetaste
I know I have bragged on your kitchen before... but it is so pretty now! I had to tell you again. Love the transformation!!
ReplyDeleteWhat a wonderful idea for over the oven... I need to do that too LOL Your kitchen looks amazing.. excellent!
ReplyDeleteGorgeous! You must tell us, did the formica marble countertops come pre-pasted onto the wood substrate like that?
ReplyDeleteLove your counters, we're considering doing the same but I'm concerned about the seam. Which edge did you choose and is there a noticeable seam?
ReplyDeleteQuestion: Did the Formica come with boards when you ordered them or did you get the roll and bought the wood separate and install it yourself?
ReplyDelete